ASTi Logo

Telestra App Note

Creating a Model for HHTs using Studio Helpers (#83)

The Hand-held Terminal (HHT) provides a highly flexible user interface for controlling and monitoring ASTi simulated radios and intercoms. This application note demonstrates how to create a model in Studio with a single HHT-based operator using a single radio. The steps shown below can easily be extended to build a model with multiple operators using HHTs to access multiple radios. For additional information on HHT operation see the ASTi Hand-Held Terminal Operator Interface Guide with Telestra (DOC-T4-HHT-UG-1).

Follow the six steps below to create a model for the HHTs. Before getting started, open Studio and create a project or open an existing project. Then create a new layout or use the default layout.

Note: This tutorial assumes the Comm Plan is set up with a proper frequency.


Step 1: Add a Domain

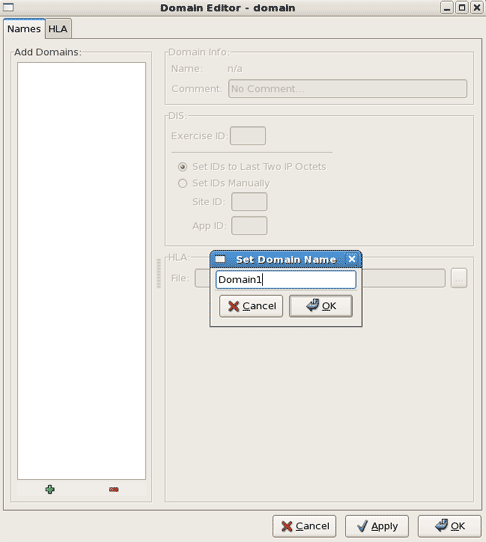
  1. Open the Domain Editor.
  2. Select the '+' and type in the Domain name.
  3. Select 'OK' to add the Domain.

    Domain Editor
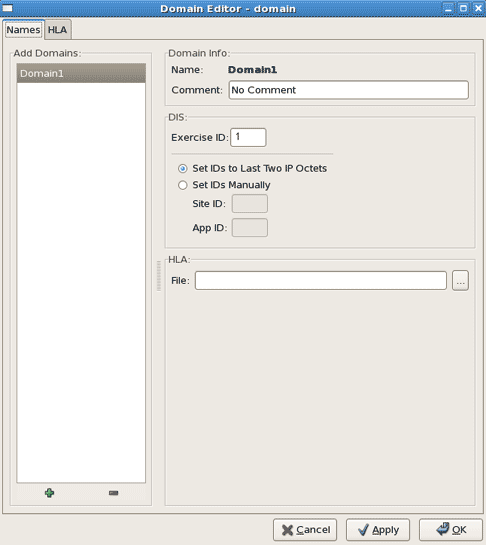
  4. Set the Exercise ID.
  5. Set the host Site ID and App ID.
  6. Select 'OK' in the Domain Editor.

    Domain Configuration

Step 2: Add a Radio

  1. Open the Radio Helper.
  2. Select the '+' and select Radio in the drop down list.
  3. Type in a radio name and select 'OK.'
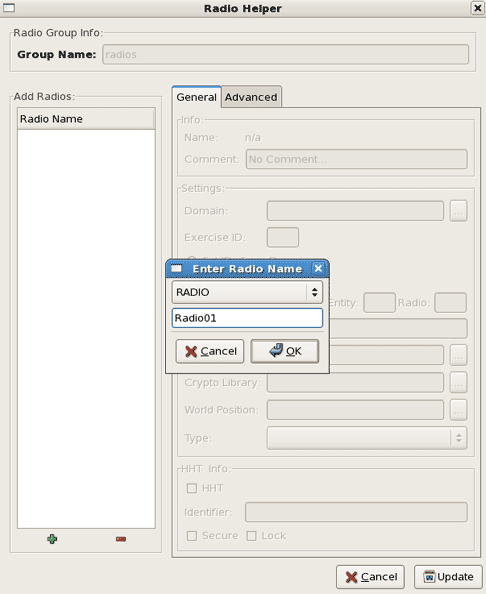
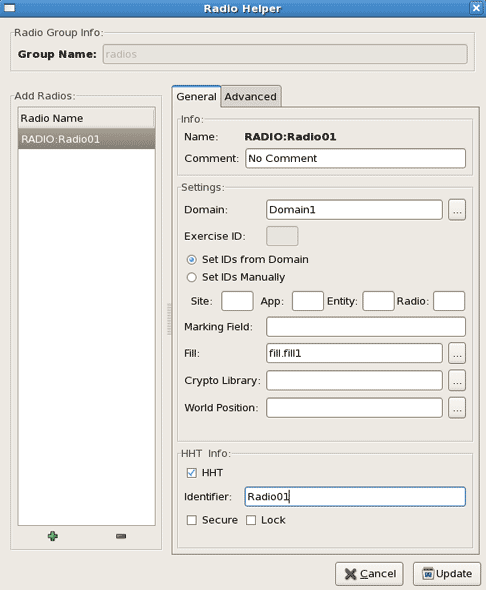
    Radio Helper
  4. Set the Domain, select the '…' box to select the Domain. All radios on a given Telestra server must have the same Domain to communicate.
  5. Select to 'Set IDs from Domain' or 'Set IDs Manually' to define the protocol ID. The protocol ID is a string of the format 'DIS:site.app.entity.radio' or 'DIS:entity.radio' or 'DIS:radio', where site, app, entity, and radio are positive integers. If you exclude site and app the radio environment will assign the default site and app from the DIS file in the Domain Editor to the radio. If you exclude entity the radio environment will assign a random, unique number for the entity ID of the radio. Ex: 'DIS:3.4' will use 3 as the radio's entity and 4 as the radio ID. The site and app are populated from the defaults in the Domain.
  6. Set the Fill. This sets the radio parameters that are set up in the Comm Plan. If using the default fill, be sure to set a proper frequency.

    Note: The Crypto Library and World Position are Optional.

  7. Check the HHT box.
  8. Optional: Add an identifier as a unique name for the radio. For example, Pilot, Copilot etc.
  9. Select 'Update'.

    Radio Helper with Configuration

Step 3: Add a Channel

The channels are the audio connection points that connect the audio distribution within the model.

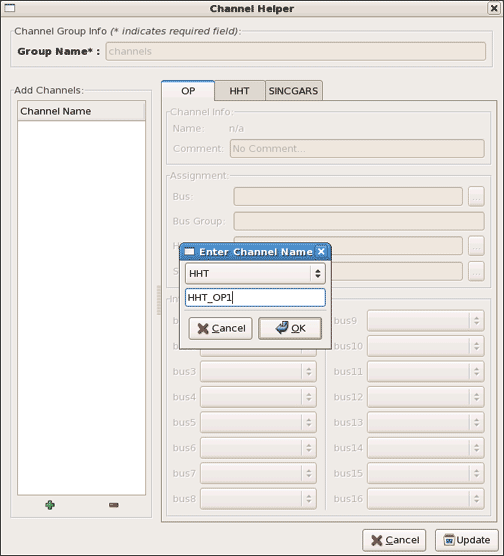
  1. Open the Channel Helper.
  2. Select '+' and select HHT from the drop down list.
  3. Type the HHT name and select 'OK.'

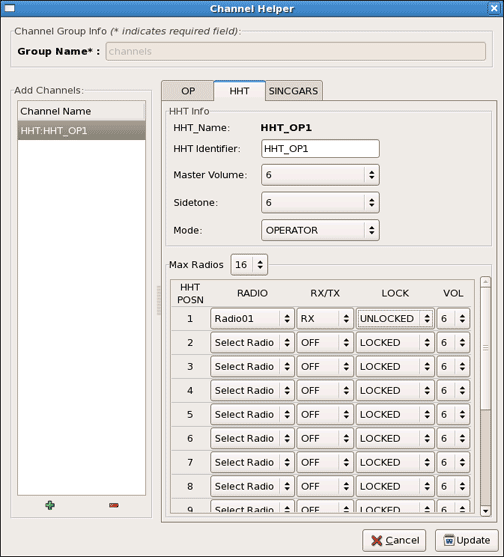
    Channel Helper
  4. Select the 'HHT' tab and under 'HHT POSN' select the radio, set the RX/TX, and LOCK. This sets the operator’s ability to receive and transmit, if locked the operator cannot change these settings.
  5. Select 'Update.'

    Operator Configuration

Step 4: Add an ACENet Audio Device

This step connects the hardware ACENet audio device to the software ACENet audio device in the model (this example uses ACE-RIUs). Each ACE-RIU is given a unique identifier name, to view the names see the Telestra web interface > ACE-RIU page.

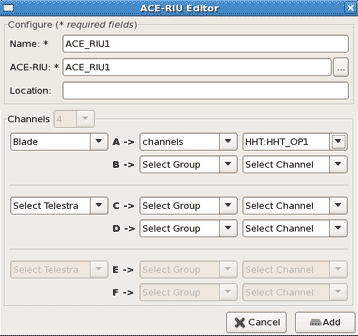
  1. In the canvas (graphical layout) right-click and select the ACENet device, this example uses an ACE-RIU.
  2. Set the name and identifier.
  3. Select the Telestra, Group and Channel. Note that the HHTs can only use Channels A and C on the ACE-RIU.
  4. Select 'Add.'

    ACE-RIU Editor

Step 5: Edit the Telestra Configuration

  1. In the canvas (graphical layout) right-click the Telestra and select 'Edit.'
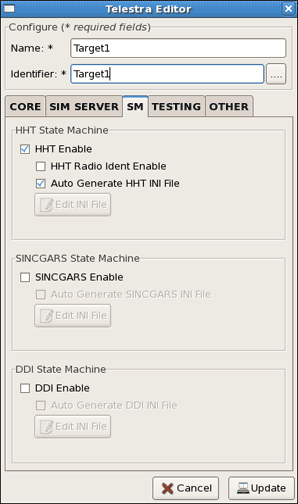
  2. In the Telestra Editor select the 'SM' tab.
  3. Check the 'HHT Enable' box and the 'Auto Generate HHT INI File' box.
  4. Optional: Check the 'HHT Radio Ident Enable' box. Set this if you assigned the radio a unique identifier (Pilot, Copilot, etc.) in the Radio Helper. Note that only the first letter of the name will appear on the HHT screen.
  5. Select 'Update.'

    Telestra Editor

Step 6: Install the Project

Select the 'Install' button. The model is complete.


This application note was created with Telestra software version 4.12.