
This app note assumes you are already mildly familiar with the Model Builder environment and can navigate it without too much difficulty. If you are not, or you need a refresher, see the Model Builder Quick Reference Guide.
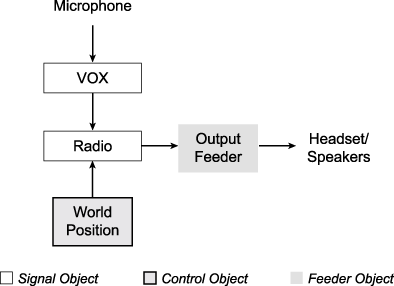
Start with a simple model with the proper output objects, RIU input, RIU output, and buffer. In the 'Signals' menu, add an audio input or Vox object. Then go to the 'Receivers' section of the menu and select the Radio object. There are a five basic objects that need to be put together for proper radio operation and simulation - Power/Mode value, Tune Frequency, Radio Position, Transmit Signal, and Output Feeder.
The input signal is usually the operator's voice, but can be a tone or another external input.
The output feeder drives the analog output to the operator's headset. Without it, no audio will be heard in the headset.
The radio object is a signal object in the signals list. It can be named anything, in this example it let's simply call it Radio. In order for the radio to be properly simulated, four things must be set in the radio object:
The Power and Tune Frequency can be set by changing the number next to the field in the radio object, or they can have control objects, such as a Boolean or a Float, inserted into the corresponding control field in the radio object.
The world position object is a control object which specifies where a radio is. It is located in the "Controls>World_position" menu. Here you have 4 options, Geocentric, Geodetic_float, Geodetic_32bit, and Entity. Let's use Geocentric for now. No values need to be entered right now, it just needs to be connected to the radio object. In our sample model let's call this object Radio_Position.
These objects are connected together as shown in Figure 1:
Set up another radio and operator. Put the second radio at a nearby world position. Tune the radios to the same frequency, and talk into one headset and get the other one to hear it.
Hints: If you have trouble, first make sure the In Gain and Out Gain on all objects are set to one. After that, try increasing the transmission power or putting the radios very close together (or even at the same location). Also make sure your input voice is loud enough to trigger the VOX. If you don't understand how the VOX works, consult the Model Builder Reference Manual.
NOTE: This example will only work if you have a host computer connected to the DACS with which to send commands in the form of ethernet packets.
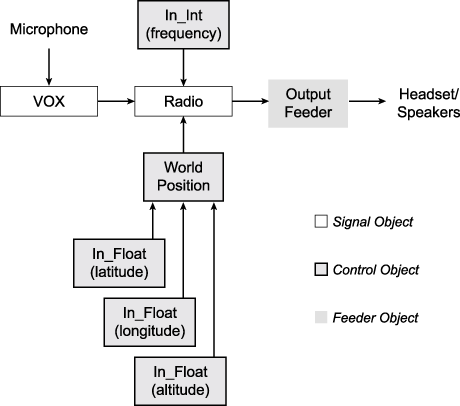
Next, we'll modify the model by adding some control objects to manipulate the radio parameters via a host computer.
This model will be a simple radio set up to allow the frequency and the position to be controlled through the Ethernet host interface. These variable controls are meant to serve as an example as to how you would change other radio attributes, such as Transmit Power, Squelch, etc.
In the Controls List there are four objects to be added: Three Float inputs and an Integer input.
Latitude, Longitude, and Altitude are input float variables. Set up the model to expect 32-bit floating point variables, starting at locations 0, 4, and 8 of the RX1 Ethernet packet. Name the variables latitude, longitude, and altitude, then insert them into the position X, position Y, and position Z fields in the world position object. To change the position of the simulated radio, all you need to do is send over new values for the Latitude, Longitude, and Altitude in the Ethernet packet from the host computer.
The frequency in this model will be controlled by an input integer from the Ethernet packet. Insert an "input_Integer" object into the "Controls" menu and name it Frequency. Set up the ethernet buffer to be RX1, like the others, and make the offset byte 12. Finally, in the Radio object (in the signals list), insert the "Frequency" integer into the Tune Frequency. As a result, when an integer is passed over the Ethernet packet to "Frequency", the frequency for the radio changes.
Figure 2 illustrates how all these objects fit together.
NOTE: You must have the DIS option installed on your machine.
For a radio to actually operate over DIS, it is necessary to have DIS configured and running. Once DIS is set up, only a few changes to the model are needed to make a radio into a DIS radio. For information on setting up DIS, see the section called DIS Configuration Commands in the Model Builder Reference manual.
Two Objects need to be changed to make the radio into a DIS radio - the radio object and the world position object.
Go to the Controls List and examine the World Position object you named Radio_position. Set the Entity No field to 1, the Exercise number to 1, and change the word next to "Entity ID" from "none" to "DIS" (This is changed by hitting the + and - keys).
When this is done, a set of numbers appears next to the word DIS. The first two numbers are the Host and Site ID, which are set when DIS is configured. The last is the Entity No which we just set to 1. The other change that has to be made is in the Radio object. Go to the signals list and examine the Radio Object. There is a field called "RadioID-DIS" on page 2 of the radio object. (Before the world position was set to DIS, this field said "RadioID-none". ) Set this field to 1.
Once these two objects have been changed, and DIS has been installed and configured for the whole system, the radio will broadcast and receive over a DIS network.
Four new numbers have been specified for the radio - the Host, Site and Entity ID (in the world position object) and the Radio ID (in the radio object). These four numbers must form a unique set. For example, you can have several radios all with the same Host, Site, and Entity ID, but they must each have a unique radio ID.
Note that all the radios in one DACS will have the same Site and Host IDs. All the radios attached to the same world position object will have the same Entity ID.