
Select Radio Monitor under the Tools menu in MBV. This will open to the Network Transmitters page of the Radio Environment. Use the shift and plus/minus (+/–) keys (number pad only) to expand or reduce the window size. The screen will display all of the radios on Exercise ID 1 (or the Exercise with the lowest ID number with radios). This page is useful when troubleshooting to see what radios are transmitting on the network. The radios are sorted by Radio ID by default; press the 'f' key to sort them by frequency.
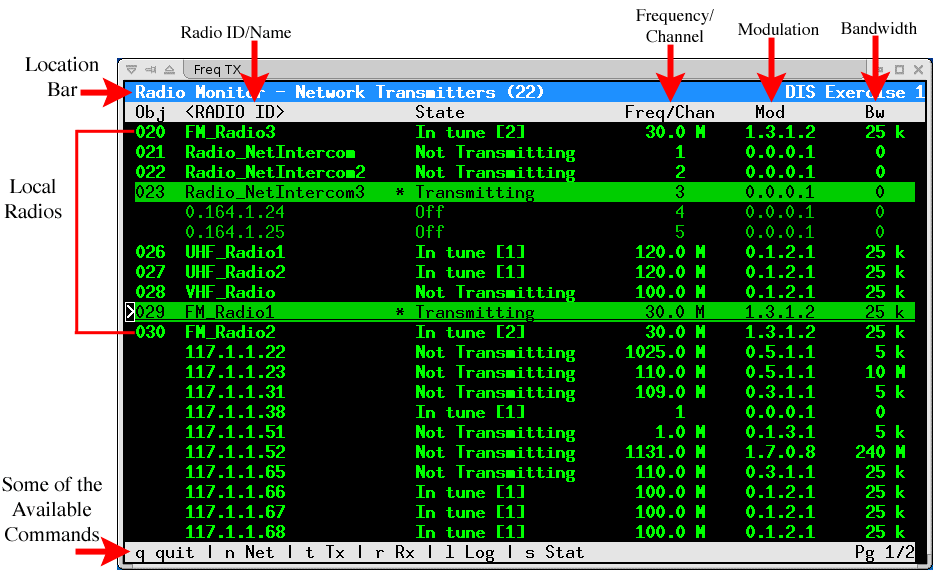
Figure 6: The Transmitters Page of Radio Monitor
Each radio displays the following details:
Radio Monitor has several other pages and commands for looking at radio lists, some are listed on the command bars at the bottom of the window such as 'q' to quit Radio Monitor. Note that most commands in Radio Monitor are toggles; in most situations pressing the same key a second time will cause the application to revert to the previous state. Other available commands include:
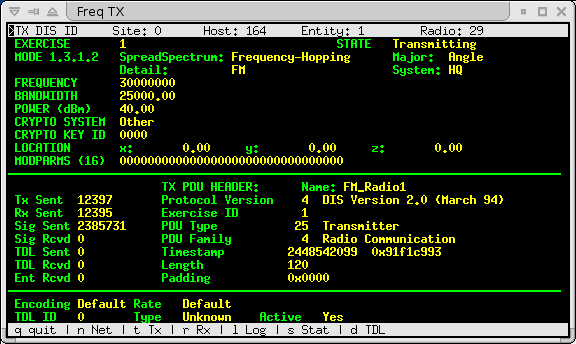
Radio Detail Page - Use the up and down arrows to select a radio and then press Enter. A new screen will show all of the information that is contained in the Transmitter PDU. Press Enter again to return to the list of radios.
Toggle Radio Names - Use the 'i' key to view the Radio Names. The Radio ID tag is replaced with the name of the radio set inside of the MBV model. Note that this will only work for local radios.
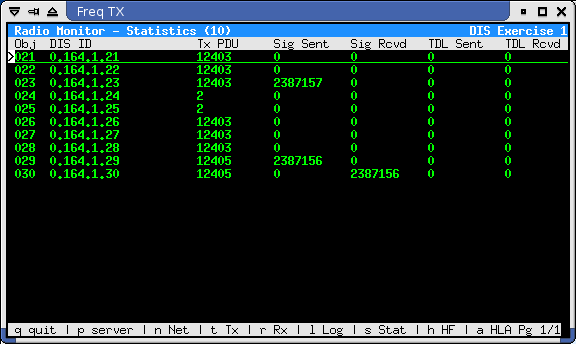
PDU Statistics - Use the 's' key to view the stats page for the radio list (valid only for local radio lists). Various counters will display the number of PDUs sent and received by the radio based on type.
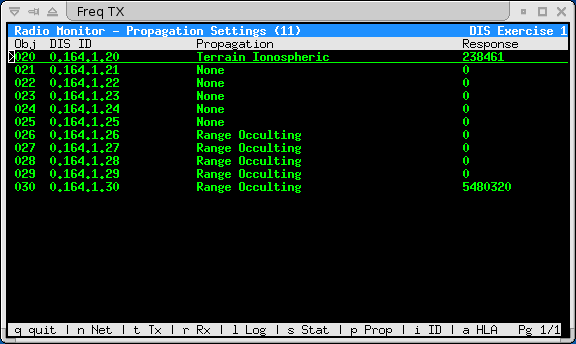
Propagation Statistics - Use the 'p' key to view the propagation page for the radio list (valid only for local radio lists). Radio Monitor will display the types of propagation that each radio is using, either Range, Occulting, Ionosphere, and/or Terrain.
Toggle HLA - Press the 'a' key to view the lists of HLA radios.
Change Exercise ID - Press the Tab and Shift + Tab keys to increment and decrement the DIS Exercise ID. Radio Monitor will only jump to exercises with radios and will not change if there is only one exercise.
In-Tune and In-Tune Detail Pages - When the cursor selects a radio use the right arrow to display the local receivers that are in-tune with that radio; pressing the right arrow again will load the in-tune detail page as shown below. When viewing the In-Tune page, Radio Monitor will indicate MIX_OK if the two radios are communicating properly. Otherwise the state will display one of the following errors: no signal, spread-spectrum mismatch, crypto mismatch, mode mismatch, jamming, or out-of-range.

Figure 7: The In-Tune and In-Tune Detail pages of Radio Monitor - Click to open in a new window.