NOTE: Model Builder versions prior to 4.04b support only data transfer over the DIS network. When using versions prior to 4.04b refer to Part III of this document for instructions on how to transmit and receive TDL information between radios that are located on the same system.
In its simplest terms, the tactical data is passed from the Host interface of one DACS to the Host interface of another DACS using the DIS network as a conduit.
NOTE: The following notes apply to using the Tactical Data Link over a DIS network. TDL may also be used to bridge data over HLA. Please refer to Part V of this document for detailed information on TDL and HLA.
A Host computer bundles the tactical data to be transmitted into a standard DIS Signal PDU (which also identifies the transmitting radio) and sends it to the DACS Host interface.
The Model Builder application software radio environment then transmits the Signal PDU onto the DIS network assuming the target radio is:
Other DACS units connected to the DIS network that contain virtual radios may receive this data depending on the state of the receiving radios. In order for the radio to receive data it must be:
If the receiving radio meets these criteria, Signal PDUs are bridged from the DIS network to the local Host network and passed to the local Host.
Signal PDUs transferred via this process are unchanged by the DACS except for the Site, Host, Entity, and Radio IDs. These fields are modified at the receiving end to reflect the receiving system and radio IDs (i.e., the local host will not see the transmitter's ID string, but will instead see the receiving system's Site, Host, Entity and Radio IDs).
In addition, the applications software does not act upon or interpret any of the data embedded in the Signal PDU. The system is simply used as a transport mechanism through the radio environment. If necessary for the simulation, the virtual radios may also transmit tactical and voice data simultaneously.
Model Builder versions 4.04b and later also have the capability to bridge Receiver (RXer) and Signal PDUs to the Host Interface. It is useful to couple over the RXer PDUs because these PDUs contain the DIS information for the receivers on that platform, their state, the DIS information of in-tune transmitters, and the received signal strength from those transmitters. The receiver states are 0 = off, 1 = on and 2 = on and receiving. Bridging the signal PDUs over to the Host Interface is only used as a debugging tool, and should be used with a great deal of caution because there can be a tremendous amount of network traffic going to the Host due to these PDUs.
It is recommended that the user have the Model Builder Reference Manual on hand when configuring objects in the MB environment. The Reference Manual has information regarding configuration of the Host and DIS interfaces.
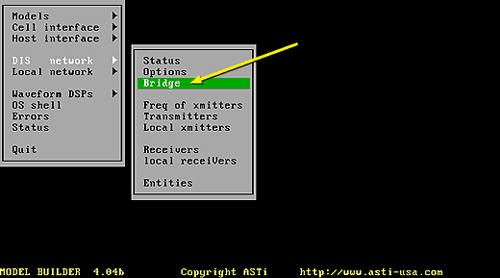
NOTE: This menu option is available only if the TDL Bridge has been enabled in the configuration file (see below).
Set the "DIS Ports" TX and RX values; ensure that the port numbers used are different than those of the Host Interface. The default values are as follows:
6994 - MB versions prior to 4.06
53100 - MB versions 4.06 and later
You will see the "Local Address IP" is in yellow, indicating that it cannot be changed from this page. This value is a reflection of the Host Interface address.
The "Broadcast PDUs IP" field sets the destination address for Signal PDUs bridged from the DACS to the Host. This field appears in blue, indicating that it can be changed from this page. The default value is 255.255.255.255.
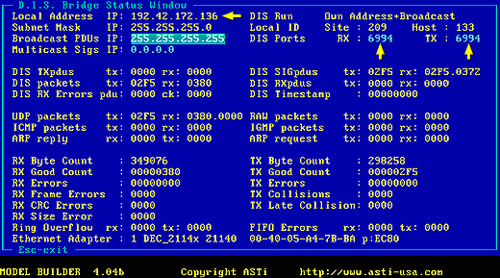
Note that any changes made on this page will only apply for the current session. Once Model Builder is exited or the system is shut down, these settings will no longer be in effect. For permanent configuration, see next section "Enabling the Bridge in the Configuration File".
To actively transmit data through the radio, toggle the "Data Signal TX" field on page 1 of the Radio Object from "Off" to "On".
If the radio was not transmitting, the words "Active TX" would appear in yellow in the lower right hand corner of the Radio Object when transmission was enabled. If the radio was already actively transmitting voice data when the Data Signal TX field was toggled, then the tactical information would be transmitted along with the voice signal.

Note that the Data Signal TX enable has a field where a Control Object could be inserted. The Control Object provides for local or remote toggling of the data transmission feature.
NOTE: In MB versions 4.09 and later, the radio object includes a "TX VoiceLockout" field. When this field is set to "On", the radio will prevent a voice signal from being transmitted while the Data Signal TX field is "On".
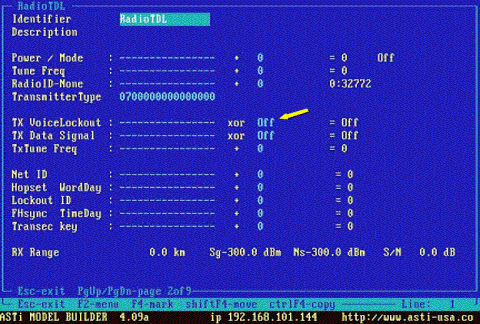
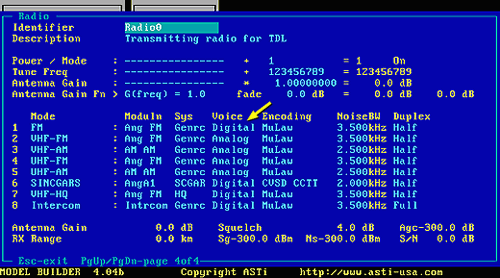
For MB versions prior to 4.06A only: In order for the Radio Object to be capable of transmitting tactical data, the Voice field must be set to "Digital" for the corresponding mode number. The Voice field is found on page 4 of the Radio Object. Refer to the Model Builder Reference Manual for additional information on the radio types and modes of operation.
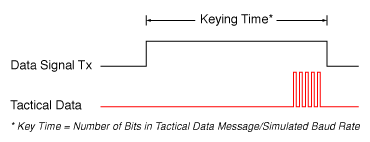
Model Builder will allow the nearly instantaneous transmission of signal PDUs over the DIS network (within the constraints of the network). This may not be accurate for your simulation needs. It does not reflect the baud rate of the transmitting radio, nor does it reflect the length of the message sent. To create an accurate simulation, add a bit of delay into the model before sending the data, or the host could simply delay sending over the data once the radio has been keyed.
More importantly, to ensure that the data is sent in its entirety, pass the data from the host to the transmitting radio towards the end of the data transmission keying. Also, have the host key the radio for transmission several seconds before the data is sent from the host. This will permit the receiving radio to acquire the transmitting radio before the data is sent. Since the DACS sends the data all at once, have the host send the signal PDU near the end of the transmit key.