
In this exercise, you will see three different ways to mix sounds. Each method has unique advantages and disadvantages. In practice, you will have to decide which approach is most appropriate based on the circumstances of the given situation.
The simplest and most obvious way to combine sounds is to use a Mixer object. You will use a Mixer object to combine five different waveforms into one Signal object, which you will connect to channel 1 of the mixing highway via a Buffer. Don't forget, you will still need an Output object to turn highway 1 on.
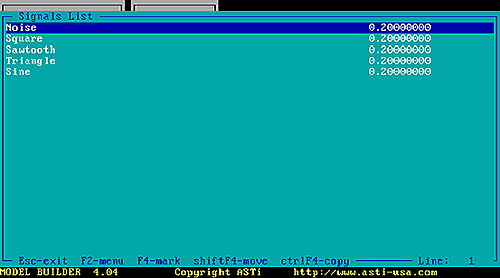
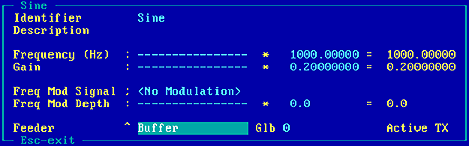
First you will need to create the sounds that you would like to mix. You will make five waveform objects. Start Model Builder and select "model1" from the "Models" menu. Press F2 to bring up the Model Submenu. Highight "siGnals" and press ENTER. From the Signal Objects List, press INSERT to add a Signal object. Highlight "Sine" and press ENTER to select the Sine object. Enter an identifier and description, as desired. Set the frequency to "1000" and set the gain to "0.2". Press ESC to return to the Signals List. If you've forgotten how to enter information into the fields, refer back to the Sine Wave Tutorial.
Repeat this procedure four more times substituting the information below:
| Signal Type | Frequency | Gain |
|---|---|---|
| Triangle Wave | 800 Hz | 0.2 |
| Sawtooth Wave | 600 Hz | 0.2 |
| Square Wavem | 400 Hz | 0.2 |
| Noise Source | 500 Hz | 0.2 |
Your Signals List now contains five objects.
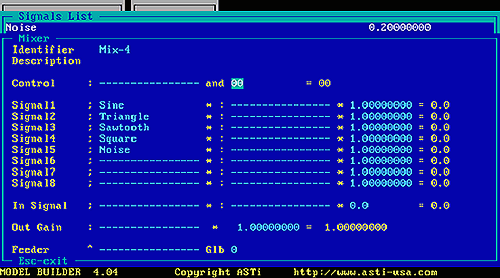
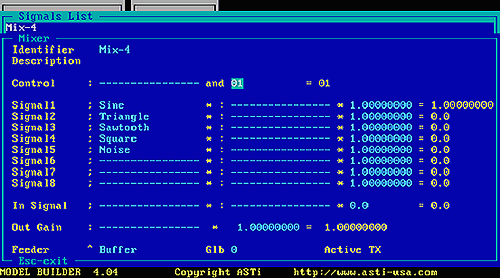
Now, you will combine the five waveforms into one Mixer object. Press INSERT to add another Signal object. This time highlight "miXer" and press ENTER (or just press the 'x' key). The Mixer Object Inspector Panel pops up.
Highlight the Signal1 Connection field ("Signal1 ; ---------------- *"), and press ENTER to open the Signal Objects List. Highlight the Sine object you created earlier and press TAB. You have now added the first Signal to the Mixer.
Use the procedure above to add the other four waveforms you created as Signals 2 through 5.

(NOTE: The order and names of the Signals depends on the information you entered.)
TIP: If you make a mistake and assign the wrong object to a connection field, you can highlight the connection field and press DELETE to remove the connection. (NOTE: Pressing DELETE in this fashion removes only the connection. The Signal object still exists in the Signals List until you delete it there.)
TIP: If you accidentally press ENTER instead of TAB when adding Signals to the Mixer, Model Builder opens the object's inspector panel. Just press ESC to return to the Signal Objects List. You can then press TAB to insert a Signal into the mixer.
Highlight the "Out Gain" field and press ENTER. Type "1.0" and press ENTER again. This is the master volume control of the Mixer. Changing this value changes the resultant volume of the final sound created in the Mixer.
Highlight the "Control" field ("Control : ----------------"). The default value is "FF". This means all the input signals are on (being mixed). Press DELETE. The value should have changed to "00". Notice the yellow gains to the right of the Signal objects all change to "0.0". No input signals are currently being mixed. As the Signals are selected their gains will change to "1.00000000".
Now that you have created a Signal object, you must connect it to the mixing highway. Since you need to connect one Signal to one highway, you will use a Buffer object. Remember, the Mixer plays five different waveforms simultaneously. Consequently, all five of those sounds will be heard on one channel of the mixing highway.
Model Builder allows you to create objects on other lists without being in the list proper. This means that you can create Feeder objects through an object on the Signals List without having to back out of the Signals List and go into the Feeders List.
Highlight the "Feeder" connection field ("Feeder ^ ----------------") and press ENTER. The Feeder Objects List pops up. The list is empty since you have not created any Feeders yet. From the empty Feeders List, press INSERT. Highlight "Buffer" and press ENTER. The Buffer Object Panel appears. Enter a name and description, as desired. Set the "To Highway" field to "1". Set the "Gain" to "1.0". Press ESC to return to the Feeders List. Notice that the Mixer Panel is still on the screen behind the Feeders List. The Buffer you just created is highlighted since it is the only object in the list.

Press TAB to insert the Buffer into the Mixer object.
TIP: It is often convenient to create several objects on other lists from within a panel. You can even create objects you do not intend to put in the connection field. For example, if you know that your model needs a Balancer object and an Output object, you can insert them into the Feeders List from within the Mixer panel, following the directions above. An object is only entered into the connection field once you press TAB.
Press ESC to exit from the Mixer Panel.
Press ESC to exit from the Signals List.
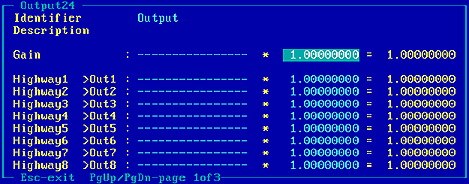
Now that the Mixer is connected to highway 1, you need to create an Output object to turn highway 1 on. Remember, you must always have an output object in order to hear any sound.
Highlight "feeDers" and press ENTER to open the Feeders List. Press INSERT to add a Feeder object to the list. Press the 'o' hot key to choose the "Output" object. Enter an identifier and a description, as desired. Set the "Gain" field to "1.0" to turn all of the highways on. (NOTE: Even though the highways are all turned on, the only highway with any signals on it is highway 1. Consequently, no sound will be heard on highways 2 through 8.)
Press ESC to exit from the Output Object Inspector Panel. The output object has been added to the Feeders List.
Press ESC to exit from the Feeders List.
If you are using a Waveform Synthesizer card, skip to the 2.6.1, "Controlling The Sound". Otherwise, if you are using a TDM system, follow the instructions below.
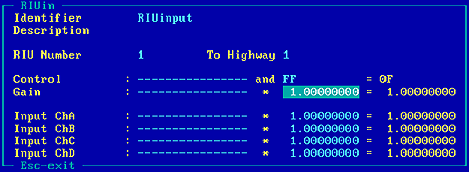
Recall that if you are using a TDM system, you must also create an input and output feeder object for each RIU. Since you are only using one RIU, you will need one RIU Input object and one RIU Output object.
First create the RIU Input object. Select "feeDers" from the Model Submenu and press INSERT. Select "RIU i/o". When the submenu pops up, select "Input_riu". Enter an identifier and description, as desired. Set "RIU Number" to "1", set "To Highway" to "1", and set the "Gain" to "1.0". You have just created an RIU Input object that connects RIU 1 to Highway 1. Remember to make sure the rotary switch on the RIU is set to 1. Press ESC to return to the Feeders List.
Now create the RIU Output object. Press INSERT, and select "RIU i/o" from the list of objects. When the submenu pops up, select "Output_riu". Enter an identifier and description, as desired. Set "Highway Source" to "1", set "To RIU Number" to "1", and set the "Gain" to "1.0". You have just created an RIU Output object that connects highway 1 to RIU 1. Any signals present on highway 1 are now directed to the output hardware connected to RIU 1.
Press ESC to exit from the RIU i/o Object Inspecter Panel.
Press ESC to exit from the Feeders List.
You still don't hear any sound because the "Control" field of your Mixer is set to "00". That means no input Signals are being mixed.
Select "siGnals" to display the Signals List. Select the Mixer object that you created. Highlight the "Control" field as before. Press ENTER and type "01". This control value turns the first Signal (Sine wave) on. You can also use the '+' key to turn on various sounds until all sounds on the Mixer panel have been enabled.
Change the value to "FF" if you would like to hear all of the sounds at once. Refer to your Reference Manual for more information on how the control value determines which Signals are mixed.
Press ESC to exit from the Mixer Object Inspector Panel.
This approach is very straightforward. It is easy to conceptualize a Mixer object that combines several signals. Furthermore, the Mixer Panel gives you a great deal of control over the various signals. And the possibility of linking mixers together allows for very complex models.
In Model A, you combined several Signals using one Mixer object. Then you created a Buffer object and used it to connect the Mixer to highway 1. Now, you will use another approach to mix sounds. Instead of using a Mixer object, you will direct all of the Signals to the same highway by connecting them directly to a single Buffer object, generating the same effect as the first approach. All of the Signals will be mixed on highway 1. You will still need the Output object to connect the highway to the outside world. And you will still need RIU i/o objects if you are using a TDM system.
If you wanted to start fresh with a new model you could clear the current configuration settings by selecting "New" from the Model Submenu. You would then press "y" to answer yes to "Clear All". However, since we have already created the necessary Signals, Feeders, and Output objects for this exercise, it is more convenient to simply delete the one unnecessary element, the Mixer.
Highlight the Mixer object in the Signals List and press F2 to display the Signals Submenu. Highlight "Delete" and press ENTER. Type "y" to answer yes to "Delete Element". (Remember, you could also have pressed the "d" hot key from the Signals Submenu, or simply pressed the DELETE key from the Signals List.)
Notice that the waveform signals are still in the Signals List. Deleting the Mixer object does not remove the Signals that were being mixed.
Since you do not have a Mixer object, you must connect each waveform signal directly to a Feeder object. The Buffer that you already created is directed at highway 1. Connecting all of the signals to that Buffer object will mix all of them onto highway one.
Select the Sine Signal object from the Signals List. The Sine Object Inspector Panel pops up. Connect the Feeder Connection field to the Buffer you created above.
REMINDER: To connect the Sine wave to the Buffer object, first highlight the Feeder connection field at the bottom of the screen ("Feeder ^ ----------------"). Press ENTER to open the Feeders List. Highlight the Buffer object and press TAB to select it from the list. The identifier you chose for the Buffer now appears in the Feeder connection field of the Sine Object Inspector Panel. Press ESC to exit from the Sine Object Inspector Panel.
Use the same procedure as above to connect each of the other waveforms to the Buffer object.
You should now hear the mixed sound on your channel 1 speaker. Notice that you did not have to make another Output object for this exercise. That's because the Output object you created in the last section works for this exercise as well. That is not always the case. If the output object from the first exercise had turned highway 1 off, we would have had to modify it, or make another output object. (NOTE: If you are using a TDM system, the RIU i/o objects you already created still work as well.)
This method utilizes the "behind the scenes" signal mixing capabilities of Model Builder. You can use this approach to save on DSP processing if you have many Mixer panels. The disadvantage is that you need more control objects to manipulate the sounds, whereas you only needed a single control object in the mixing panel example.
If you are using a TDM system, here is yet another way to mix signals. In this exercise, you will connect each signal source to a different Highway, using Buffer objects. You will then create several RIU Output objects to connect each of those highways to a single RIU on the TDM ring. Consequently, each signal will be on a different highway and each of those highways will directed to the same RIU. The sounds will be mixed in various combinations on the four RIU output channels. For example, if every RIU Output object turns chA on, then all of the sounds will be heard on chA. But if the only RIU output objects that turn chB on are those going from highways 1 and 2, then only the signals on those highways will be heard on chB. You will also need to create an RIU Input object.
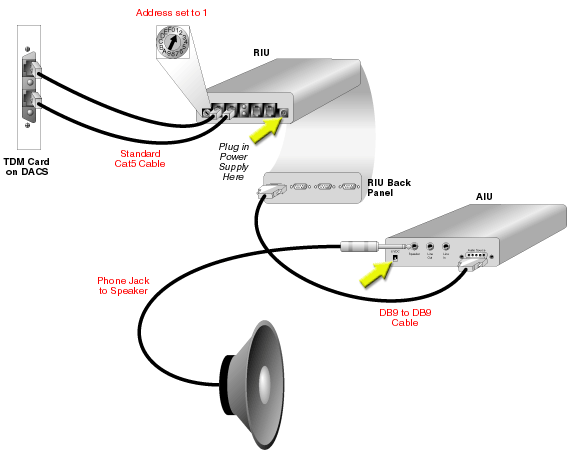
Before continuing, make sure your system is set up according to the following figure:
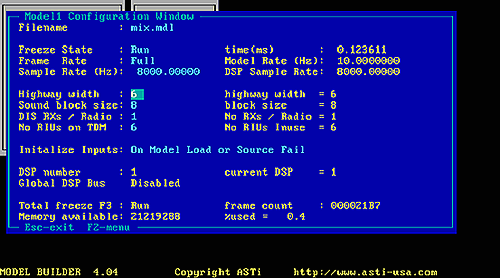
In this exercise, you will use five different highway channels. But the default number of usable highways is "2". As your first task, you must change that value. Return to the Model Configuration Window. If you are currently viewing the Model Submenu, press ESC. Or from the Main Menu, select "Models". Now, highlight the "Highway Width" field and press ENTER to switch to edit mode. Then type the value "5" and press ENTER again. Notice that the field remains in edit mode. Model Builder will only allow multiples of 2 for the "Highway Width". Change the value to "6" and press ENTER again.
Right now, all of the Signal sources are connected to a single Buffer object, placing them on highway 1. You need each signal to be on a different highway. Therefore, you will need to create a different Buffer object for each Signal. You can leave the "Sine" wave connected to highway 1, and place each other Signal on a different highway.
First give the Buffer you already created a more meaningful name and description. Press F2 and select "feeDers" from the Model Submenu. Choose the Buffer object. When the inspector panel pops up, change the "Identifier" to "CHANNEL1" and change the "Description" to "SINE --> HWY1". This buffer will connect the Sine wave to highway 1.
Press ESC to exit from the Buffer Object Inspector Panel.
Press ESC to exit from the Feeders List.
Now, you need to create a Buffer for each of the other Signals. Select "siGnals" from the Model Submenu. Open the Triangle Object Inspector Panel. Highlight the Feeder connection field at the bottom of the screen and press ENTER. The Feeders List appears. But you still need to create the Buffer. Recall that you can create objects from within the connection field. Notice that the connection field is currently connected to the "CHANNEL1" buffer. Connecting it to another buffer will simply replace the old connection. Press INSERT and choose "Buffer" from the list of objects. Change the "Identifier" to "CHANNEL2" and change the "Description" to "TRIANGLE --> HWY2". Also set the "Gain" to "1.0", and change the "To Highway" field to "2" so that the Triangle signal will be on a different highway. Finally, press ESC to return to the Feeders List, and press TAB to replace the old Buffer with this new one.

Now, the Sine and Triangle Signals are on highways 1 and 2 respectively. Follow the same procedure to create buffers for the "Sawtooth", "Square", and "Noise" sources, connecting them to highways 3, 4 and 5 respectively.
After you have finished, your Buffers should have the following attributes:
| Identifier | Description | Connected From | Connected To |
|---|---|---|---|
| CHANNEL1 | SINE --> HWY1 | Sine Wave | Highway 1 |
| CHANNEL2 | TRIANGLE --> HWY2 | Triangle Wave | Highway 2 |
| CHANNEL3 | SAWTOOTH --> HWY3 | Sawtooth Wave | Highway 3 |
| CHANNEL4 | SQUARE --> HWY4 | Square Wave | Highway 4 |
| CHANNEL5 | NOISE --> HWY5 | Noise Filter | Highway 5 |
Now that each of the Signals is on a different highway, you need to connect those highways to RIU 1. Remember there must be at least one RIU Input object and at least one RIU Output object for each RIU on the TDM ring. You should have already created both an RIU Input object and an RIU Output object in your construction of Model A. The RIU Input object that you already created will work fine for this exercise. But, you will need multiple RIU Output objects to mix the sounds.
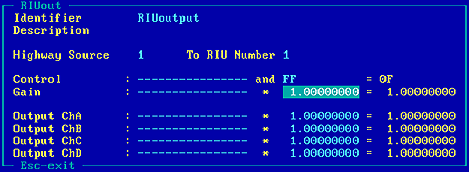
From the Feeders List, highlight the "RIU Output" object and press DELETE. Press 'y' to answer yes to "Delete Element".
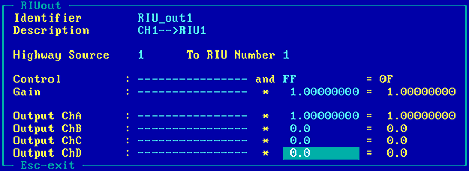
Now, you will create five new "RIU Output" objects, one for each highway you are using. Press INSERT, and choose "RIU i/o" from the list of Feeders. When the pop up menu appears select "Output_riu". Enter "RIU_out1" for the "Identifier". Enter "CH1 --> RIU1" for the "Description. Set the "Highway Source" to "1". Set "To RIU Number" to "1". And set the "Gain" to "1.0" We have just created an RIU Output object that connects Highway 1 to RIU 1. Notice that all four of the RIU's output channels are turned on. Highlight the number field next to "Output ChB". It is in the second column, containing the value "1.00000000". Press ENTER to switch to edit mode, type "0", and then press ENTER again. Or, you can highlight the field and press DELETE. Repeat these steps for ChC and ChD. Now, only ChA is on. That means that we will hear the signals on highway 1 only on a device connected to ChA of the RIU.
Press ESC to return to the Feeders List.
Follow the procedure above to create four more RIU Output objects. Use the information in the table below:
| Identifier | Description | Highway Source | To RIU | Channels On |
|---|---|---|---|---|
| RIU_out1 | Ch1 --> RIU1 | 1 | 1 | A |
| RIU_out2 | Ch2 --> RIU1 | 2 | 1 | A, B |
| RIU_out3 | Ch3 --> RIU1 | 3 | 1 | A, B, C |
| RIU_out4 | Ch4 --> RIU1 | 4 | 1 | A, B, C, D |
| RIU_out5 | Ch5 --> RIU1 | 5 | 1 | A, D |
Notice that each RIU output object turns on a different subset of channels. ChA is driven by all of the RIU Output objects. Consequently, all of the signals will be mixed on ChA, no matter what highway they are on. However, only RIU_out3 and RIU_out4 turn on ChC. Thus, only the signals on highways 3 and 4 will be heard on ChC.
You should hear all of the signals since your output device is connected to ChA. If the sound is too loud, or you need to stop it quickly for some other reason, pressing F3 temporarily freezes the model. Pressing F3 again will resume the model. While the model is frozen, you can still move around in Model Builder and change values, but the effects will not be heard until you "unfreeze" the model.
To hear a different subset of sounds, move the RIU to AIU cable from ChA to another channel.
The point of this exercise is to show how different sounds can be mixed onto different channels of an RIU. These could be tones or received audio from radio devices or voice warning system prompts. In fact, you can also mix different sounds on several RIU's. The sound on any highway can be directed to any subset of channels of any RIU on the ring. This method is not as inherently obvious as the first two models were, but it is a very direct approach. Instead of using Mixer panels, this method utilizes the built-in mixing capabilities of Model Builder. It is not usually necessary to use such a "nuts and bolts" approach. But occasionally it is useful, for instance when you are low on system resources.
You have now mixed sound signals in several different ways. First, you combined the Signals into one Mixer object and connected it to highway 1 using a Buffer object. Next, you deleted the Mixer object and connected each of the signals directly to the Buffer object. Finally, if you were using a TDM system, you placed each Signal on a different highway (using Buffers), and connected the highways to various subsets of RIU Output channels using RIU Output objects.
Which method is best? It depends on the given situation and your own personal preferences. Each method has advantages and disadvantages. For example, the Mixer object used in Model A provides an overall volume control that changes all of the signals at once. Mixer objects may also be linked together to create more complex models. However, when making a very simple model, it may be easier to just connect each Signal to the same Buffer object as in Model B. This approach also uses less system resources. The final method, Model C, provides much more flexibility. Rather than mixing all of the Signals onto one highway, this method allows you to mix the Signals in various combinations by placing each one on a different highway and then toggling the RIU Output channels on and off.