The following screen captures are intended to aid the user in identifying key points of implementing a successful Tactical Data Link.
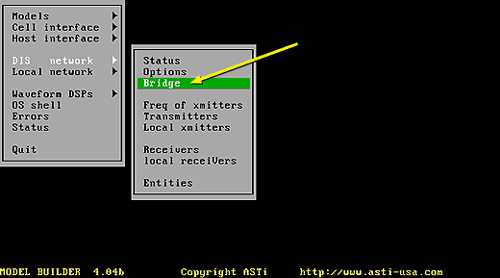
When the correct line has been added to the configuration file to enable the TDL functionality (DIS_Bridge=ON), the DIS sub-menu will expand to include the DIS Bridge option.
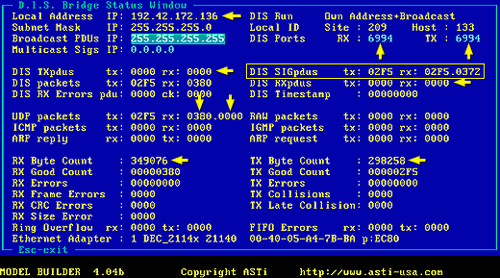
The DIS Bridge Status Window is invaluable in identifying the correct operation of the TDL. From this page it is possible to ascertain much about the operation of the TDL. Remember the source for the Data Signal PDUs is the local host, and hence the packets enter the DACS via the host Ethernet port. The IP address of the host interface is shown on the top line of the page (titled "Local Address"). Additional information is shown, note particularly the RX and TX UDP port numbers for the TDL bridge function.
Important note: these must not be the same as any of the port numbers used for the reception of host Ethernet packets, as displayed on the Ethernet Control Window page.
The remaining information on this page relates to the flow of data both in and out of the DACS via the Host Ethernet interface and the DIS Bridge ports. The page is split into three blocks or layers, and these translate directly into layers within the software.
The lower section of the page relates to raw data seen at the card level. If data is being sent by the host then the RX Byte Count field will be seen to increment. Similarly if the DACS is outputting data then the TX Byte Count will be seen to increment.
The next block of counters relates to data seen at the Ethernet UDP protocol level. This is a good place to confirm that IP Addressing and UDP port numbers are set-up correctly. Particularly note the UDP Packets counter. Look at the RX field. This is split into two sections, separated by a ":" character. The count to the left of the ":" indicates packets that were received into the DACS correctly (i.e. the IP address and UDP port numbers were correct for reception of the packet). The count to the right of the ":" indicates packets that were recognized as valid UDP packets, but were rejected because the UDP port number was not correct.
The upper block of counters relates to DIS packet level. Initial sanity checks here are to look at the DIS Packets count. If the host is sending valid DIS type PDUs the "rx" counter will be incrementing. Similarly if the DACS is receiving data packets and bridging them out to the host, then the "tx" counter will be incrementing.
Next look to the counter titled "DIS SIGpdus". The values shown here will basically indicate successful transmission and reception of data signal PDUs. The numbers shown here actually relate to both voice and data signal PDUs, both received and transmitted by the DACS. The "rx" counter is split into two sections, the left section indicating signal PDUs that were both recognized and received by the DACS, whilst the right section indicates signal PDUs that were seen by the DACS but not bridged through. If the left and right sections of the counter are incrementing this indicates that all parameters, including the specific radio set-up, are correct and successful bridging of data packets and transmission by a radio is taking place. If only the right-hand section of this counter is incrementing, then this usually means that either the DACS recognizes the packets as Signal PDUs but not Data type (therefore check the PDU format, particularly the Encoding Scheme field), or that the radio set-up is incorrect (check particularly that the DIS ID number is set correctly in the Data Signal PDU).
The "tx" field of the DIS SIGpdus counter will indicate successful reception by a receiving radio of a Data Signal PDU. Note only Data type packets are recorded on this counter, so this is a certain way to confirm reception of a Data packet.
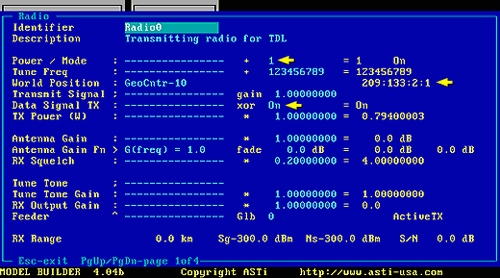
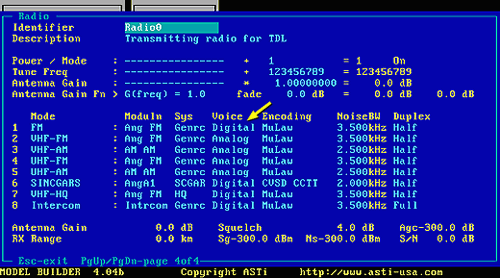
The next screen shows a radio that is correctly set-up for TDL use. This is page 1 of the Radio Object. Note the radio has a mode of "1" and has a valid frequency. Also note the DIS ID displayed on the World Position line. It is this ID that must be set-up in the Data Signal PDU, in the Transmitter and Radio ID fields. Finally note that the Data Signal TX control has been set to "ON". This must be done in order to configure this radio to be able to bridge Data packets.
The next screen is page 4 of the Radio Object.
For MB versions prior to 4.06A only: The important thing to note on this page is that the radio "Voice" type for Mode 1 (FM) is set to "Digital". This voice type must be set for all modes that the radio is to operate in when TDL is required.
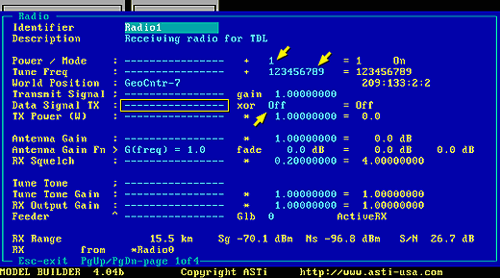
The radio shown below is set-up to receive correctly from the transmitting radio. Note the mode and frequency match that of the transmitter. Also note that the Data Signal TX control is set to "OFF". Since otherwise the radio would be in transmit mode. Note, therefore, that if a radio is required to both transmit and receive data packets, it will be necessary to add a host driven control into the Data Signal TX connection field, to switch the radio into Data TX mode when required and then back into normal operation otherwise.
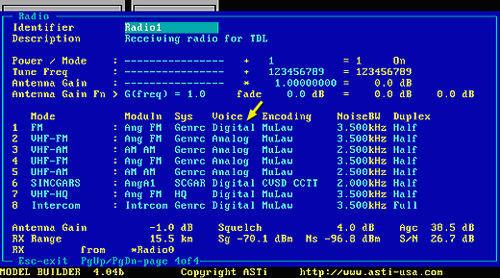
The following screen again shows page 4 of the receiving radio.
For MB versions prior to 4.06A only: Note that the "Voice" field is set to "Digital" for Mode 1.
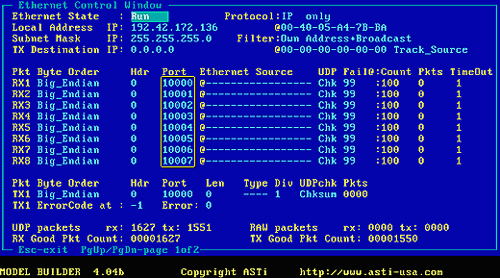
The final screen shows the (Host) Ethernet Control Window. The important thing to note is that none of the RX1 through RX8 port numbers matches that being used for the DIS Bridge function. If they did, then the data intended for the DIS Bridge would be "intercepted" by the receive buffer, and not be passed on as intended.
NOTE: MB versions 4.09 or later include an additional buffer (RX9).