ASTi Logo

Telestra FAQ

How do I set DIS Entity Attach in Studio

There are two ways to attach to an entity either through DIS IDs or the DIS marking field. There are three places in Studio where you can set your DIS IDs depending on how you build your model.

  1. Domain Editor – Use the Domain Editor to globally set the DIS ID for all radios in the Project.
  2. Radio Helper – Use the Radio Helper if you want to set different DIS IDs for radios that were created using the Radio Helper.
  3. Transceiver component – Use the Transceiver component if you manually created your model and wish to set different DIS IDs for different radios.

DIS Syntax

The syntax for setting up a DIS radio has the string format of 'DIS:site.app.entity.radio' or 'DIS:entity.radio' or 'DIS:radio'. If the site and app are excluded from the string, the radio environment will assign the default site and app from the DIS file in the Domain Editor. If the entity is excluded, the radio environment will assign a random/unique number entity ID for the radio. This must be unique within the DIS network.

For Example:

DIS:100.100.1.1 will set Site = 100, App = 100, Entity = 1 and Radio = 1

The marking field allows entity attach with text. This can be set in the Radio Helper using an 11-character string (maximum). The syntax for this is:

DIS:Site.App.Entity.Radio:MarkingField

Or if you only want to use the marking field, the syntax is:

DIS::MarkingField

For Example:

DIS::Viper2

Domain Editor

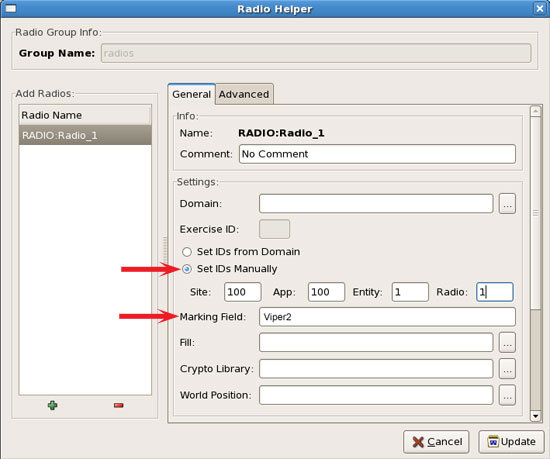
If you want to globally set the DIS ID follow the steps below:

  1. Open your Project. In the Layout, double-click on the Domain Editor.
  2. In the Domain Editor, select the Domain.
  3. Select to "Set the IDs Manually."
  4. Set the Site and App ID of the entity the radio will be attached to.
  5. Select "Apply."
  6. Reinstall the Project.

Radio Helper

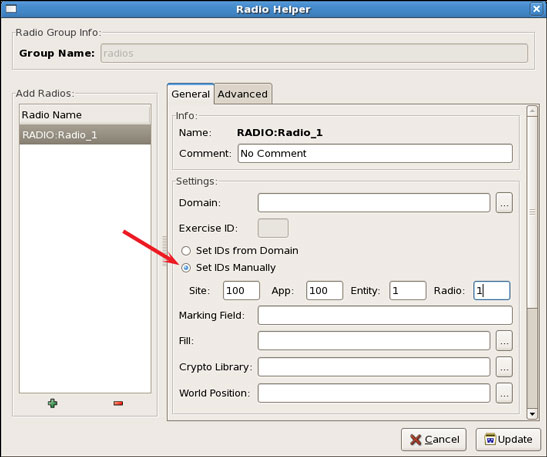
If you are using the Radio Helper to create your radios, follow the steps below to set the DIS ID in Studio:

  1. Open your Project. In the Layout open the Radio Helper.
  2. Inside of the Radio Helper, you will see a list on the left-hand side that has all of your radios in the model.
  3. Select a radio and you will see the settings in the right-hand side of the window.
  4. Select to "Set IDs manually".
  5. Set the "Site", "App" and "Entity" fields to match the DIS ID fields of the entity you wish this radio to attach to.
  6. Select "Update" and reinstall the Project.

Model

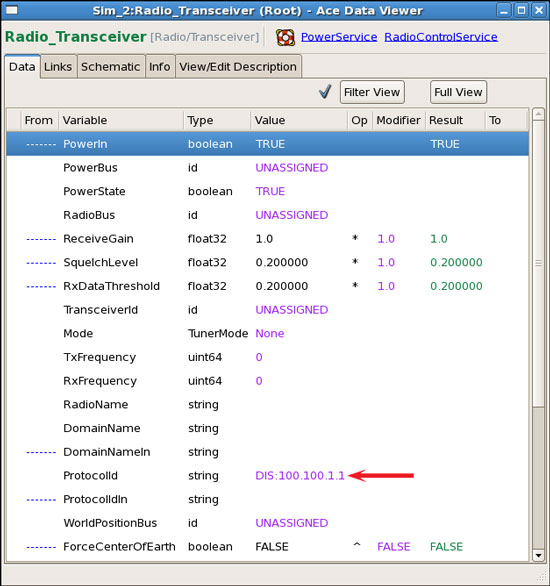
If you are building your model, follow the steps below to set the DIS ID in Studio:

  1. Open your Project and model.
  2. Double-click the Transceiver component to open it.
  3. Set the Protocol ID with the DIS syntax. To do this, you must double-click in the "Value" column.
  4. Reinstall the Project.

Verification

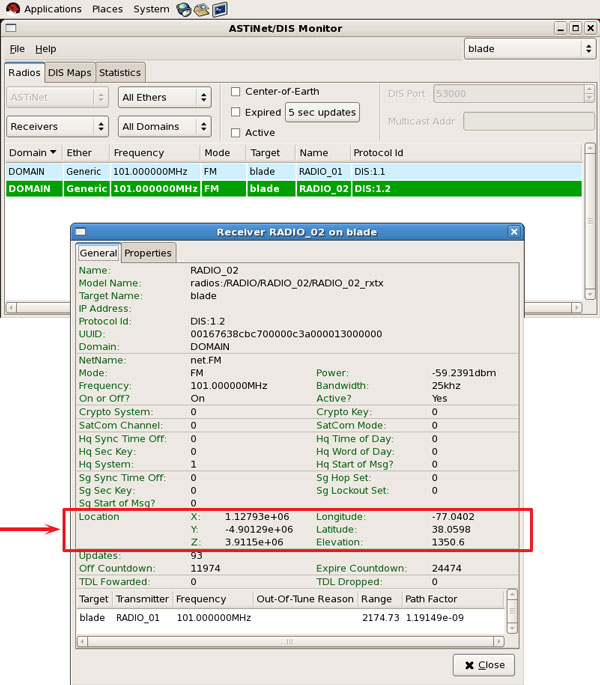
To verify the entity attach, open the Radio Monitor (Applications > ASTi) and select the radio. View the "Location" values. If these are 0,0,0 then the radios are not on the same network or the parameters are wrong.