
Here is an exercise to help demonstrate some of the basics of Model Builder. You will build a simple model that plays a 1,000 Hz sine wave continuously on the channel 1 speaker.
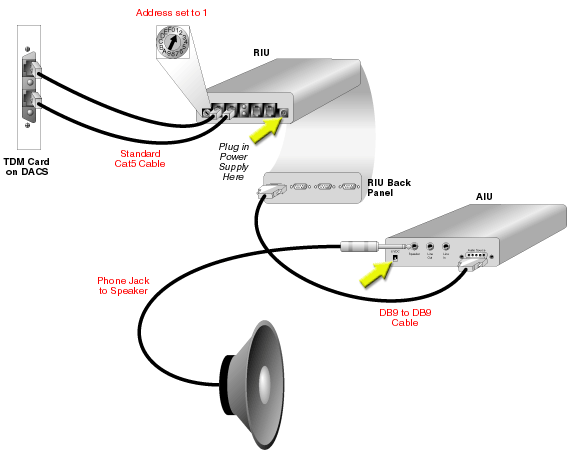
If you are using a TDM system, your equipment should be set up as follows. Connect an RIU to the TDM card on the back of the DACS and set the RIU address to 1. Connect an AIU to RIU Channel A with a DB9-to-DB9 cable. Connect a speaker to the AIU using the speaker jack on the back panel of the AIU. Don't forget to plug in the provided power supplies to both RIU and AIU.
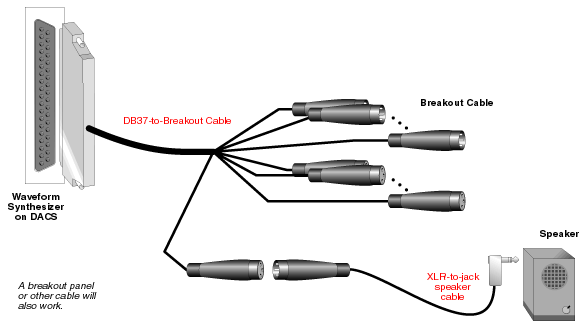
If you are using a system with a Waveform Synthesizer DSP, your equipment should be set up as follows. Connect a breakout cable, breakout panel or other DB37 cable to the WS on the back of the DACS. Connect a speaker to the cable or panel using an XLR-to-phone jack cable. Make sure power is supplied to the speaker if necessary.
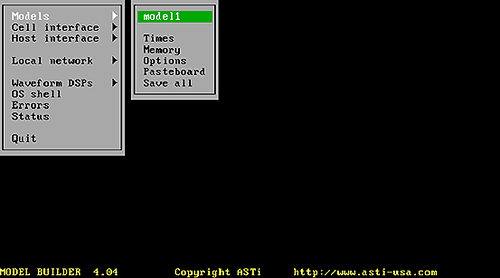
To enter Model Builder, type MB at the path: C:\MBUILDER\USER\MODELS -->. (NOTE: Model Builder loads automatically when you boot your system).
Use the arrow keys to highlight the "Models" option from the main menu, and press ENTER. A list of models appears. One model will appear for each DSP board installed. The first DSP board is controlled by "model1", the second DSP is controlled by "model2", and so on. (NOTE: Model Builder supports Hot Keys. Whenever a menu option has a capital letter, that option may be selected by simply pressing the corresponding key. For example, the "Models" menu may be accessed by pressing the 'm' key.)
Highlight "model1" and press ENTER to access the model controlling the first DSP board. Once the Model Configuration Menu appears, press F2 to open the Model Submenu. (Pressing F2 in Model Builder will open the next available submenu.)
NOTE: When several menus, or windows, are open at once, only the most recently opened window may be accessed. Pressing ESC once returns you to the previous window. To return to the main menu, you must press ESC successively until you have backed out of all other windows.
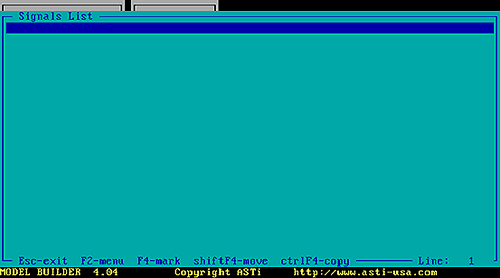
First, you will create the sound source (Signal object). From the Model Submenu, highlight "siGnals" and press ENTER (or use the 'g' Hot Key). The Signal Objects List for "model1" appears. The list is currently empty because this is a new model. Model Builder will display signal objects in this list as you add them to the model.
Press F2 to bring up the Signal List Submenu. Highlight "Insert" and press ENTER. You can also select the "Insert" option by pressing the 'i' hot key from the Signal List Submenu. Alternatively, you can skip the Signal List Submenu altogether and just press the INSERT key from the Signal Objects List. Other options can be executed in the same manner. For example, you can delete a signal object from the Signal List by pressing the DELETE key. These keys work the same way for other types of objects.
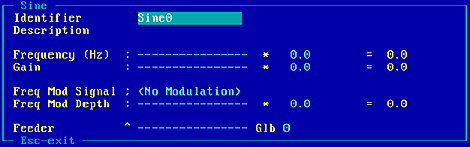
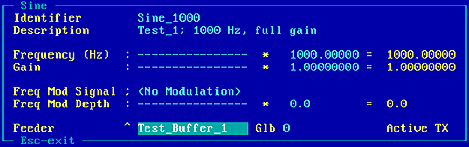
Accessing the submenu provides you with a list of available Signal objects. Highlight "Sine" and press ENTER. The Sine Object Inspecter Panel appears. An object's panel allows you to configure the settings for that object.
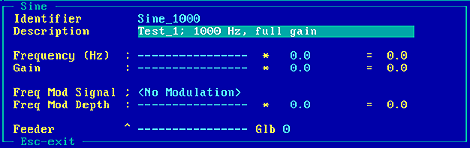
Model Builder automatically chooses a unique identifier for each object as it is created. But it is often useful to give objects more meaningful names. Highlight the "Identifier" field and press ENTER. The field color changes from blue to red, indicating you are in edit mode. Type "Sine_1000", and press ENTER. You can also give objects meaningful descriptions. Highlight the "Description" field and press ENTER. Type "Test_1; 1000 Hz, full gain". Press ENTER again to return to Selection mode. (NOTE: It is not necessary to include a name or description for an object).
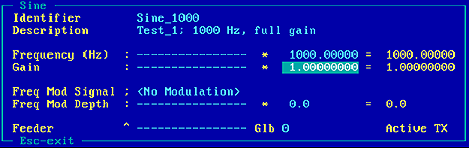
The inspecter panel contains two input fields for the "Frequency (Hz)" and two identical fields for the "Gain". The fields containing dotted lines (": ---------------") show where Control objects can be inserted. The other fields set the value of the frequency and amplitude. They contain the number "0.0" by default. Ignore the Control object fields for this exercise. Highlight the number field for "Frequency (Hz)" and press ENTER. The field changes from blue to red indicating that you are in edit mode. Type "1000," to set the frequency at 1000 Hz and press ENTER again. Select the number field for "Gain" and change the value to "1.0". (NOTE: Once the "Frequency" and "Gain" settings have been changed from their initial value of "0.0", the numbers may be incremented and decremented by 5% using the '+' and '-' keys.)
REMINDER: Blue fields in an object's panel can be modified, and yellow fields show results
Press ESC to return to the previous screen. The Signals List now contains one signal -- the sine wave.
Press ESC to return to the Model Submenu.
You have just defined what you will hear -- a 1,000 Hz sine wave at full gain.
Recall that feeder objects determine where the sound is heard. The sine wave you created is currently not heard anywhere, since it is not connected to the mixing highway. You will use a Feeder object called a buffer to connect the sound source to the highway. A Buffer object creates a one-to-one relationship between a Signal object and a single channel (highway).
From the Model Submenu, highlight "feeDers" and press ENTER. The empty Feeders List appears. Press INSERT to display the list of possible feeder types. Highlight "Buffer" and press ENTER. The Buffer Object Inspecter Panel pops up.
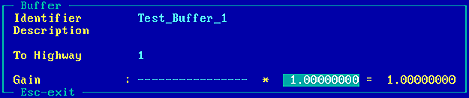
Enter "Test_Buffer_1" for the "Description" field. Enter "1" for the "To Highway" field. Set the "Gain" to "1.0". Remember, pressing ENTER while a field is highlighted toggles the edit mode on and off.
Finally, press ESC to finish creating the buffer object and view it in the Feeders List.
Now that we have a Feeder Object, we must connect it to the sine wave. Press ESC to return to the Model Submenu and select siGnals again. The Sine Object is already highlighted since it is the only object listed. Press ENTER to view the Sine Object Inspecter Panel. Highlight the dashed line next to "Feeder" ("^----------------"), and press ENTER. Model Builder automatically opens the Feeders List for you. The Buffer object is already highlighted since it is the only feeder we've created so far. Press TAB to insert the highlighted buffer object. (NOTE: Pressing ENTER will display the Buffer Object Inspecter Panel. If you've accidentally hit ENTER, press ESC and then TAB to insert the buffer object.)
Press ESC to exit the Sine Object Inspecter Panel.
Press ESC to exit the Signals List.
You just used a Buffer object to connect the Signal Object to the mixing highway, but the mixing highway is not yet connected to the outside world. So the model still will not output sound. As explained earlier, the output object is the final connection between the audio output hardware and the objects you define in Model Builder.
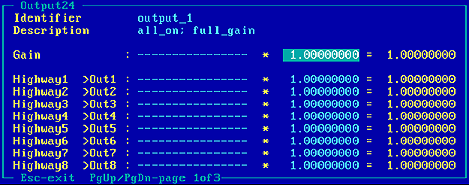
The Output Object determines which highways are on and which are off. If highway 1 is on and the rest of the highways are off, any signals directed at highway one will be heard through the device connected to channel 1. Nothing will be heard on the other channels since those highways are off. Select "feeDers" to display the Feeders List. Press INSERT and choose "Output" from the list of objects. The Output Object Inspecter Panel pops up.
Notice that all eight highway lanes are set to "1.0". However, the output is currently off since the "Gain" is "0.0". Enter "output_1" into the "Identifier" field. Type "all_on; full_gain" in the "Description" field. Set the "Gain" to "1.0". All of the highways are now on. But the sine wave can only be heard on channel 1 since that's where are feeder directed the sound.
Press ESC to return to the Feeders List.
Press ESC to return to the Model Submenu.
If you are using a Waveform Synthesizer card, you should already hear the sound. Skip to 4.1, "Saving The Model". Otherwise, if you are using a TDM system, follow the instructions below.
If you are using a TDM system, you must also create output and input feeder objects for each RIU. The RIU output object defines which highway will go to the RIU. The RIU input object allows the RIU to connect back to Model Builder for synching and notification. You will not hear your sine wave until you create these objects.
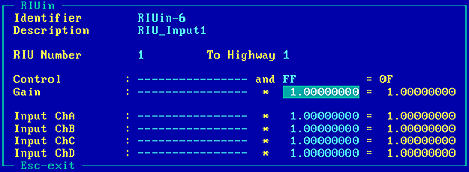
Select "feeDers" from the Model Submenu. Press F2 to view the Feeders Submenu, and select "Insert". Choose "Riu i/o" from the list of objects. Another pop up menu appears. Choose "Input_riu" from the menu to display the RIU Input Object Inspecter Panel.
Recall that each RIU on the TDM ring has a unique address. We must tell the computer which RIU this input object is for. We will use RIU 1. Make sure the physical address of the designated RIU is set to "1". A small rotary switch on the front of the RIU sets the address. Enter "RIU_Input1" for the "Description". Also, enter "1" for the "Riu Number" and "1" for the "To Highway". This means RIU 1 connects back to Highway 1. Enter 1.0 for the "Gain".
Press ESC to finish creating the RIU input object and view it in the Feeders List.
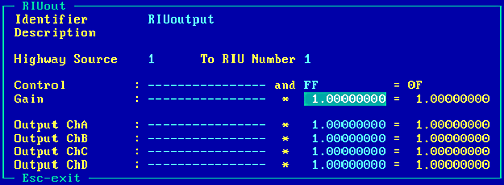
Press INSERT to display the Feeders Submenu and choose "Riu i/o" from the list of objects. This time, select "Output_riu". The RIUout Inspecter Panel pops up.
Enter "RIU_Output1" for the "Description". Enter "1" for the "Highway Source" and "1" for the "To RIU Number" field. We have now routed highway 1 to RIU 1. Set the "Gain" to "1.0". Notice the four channels listed at the bottom of the screen (ChA, ChB, ChC, ChD). These correspond to the output channels on the back of the RIU. All signals present on highway 1 will be sent to the subset of channels that we turn on. Since all four channels are currently on, the sound will be sent to all four channels.
(NOTE: These channels are not the same as the highways. Turning ChB on, for instance, will not connect highway 2 to the RIU.)
Press ESC to finish creating the RIU output object and view it in the Feeders List.
Press ESC to return to the Model Submenu.
If you were to exit out of Model Builder right now, the model you've just created would be lost. Model Builder will not prompt you to save changes before exiting. So, it is important to save your work often.
Since this model is a new, untitled model, we will use Model Builder's "save As" option to give the model a specific filename. Press 'a' to select "save As" from the list of options in the Model Submenu. Type "sinewave" in the field and press ENTER. Model names may consist of up to eight characters, with spaces not allowed. Your model has now been saved. From this point on, you may use the "Save" option to preserve your changes.
To build this model, you created a sine wave (signal object) and connected it to a buffer (feeder object), which was in turn connected to a single highway. Then, you defined an output object with all eight channels of the highway turned on. If you were using a TDM system, you also connected that highway to an RIU.