
Returning now to the system, from the Model1 Configuration Window select the F2 function key. This will bring up a menu on the right of the screen, with the first three lines corresponding to the objects described above. Selecting on any of these will bring up a list of the particular objects of the selected category that make up this model. The approach used to construct a model will depend on personal preference, but a good starting point is to consider the signal objects required, since the signals will dictate to a certain extent the controls that are required
Therefore move the cursor down to highlight the "Signals" option and select return. This will bring up a list of all the signal objects used in the model. Note also that it is possible to include comment lines. These are the lines of text generally preceded by a string of "*" characters, or in some cases blank spaces. Over time the value of generous use of comments within a model will become evident
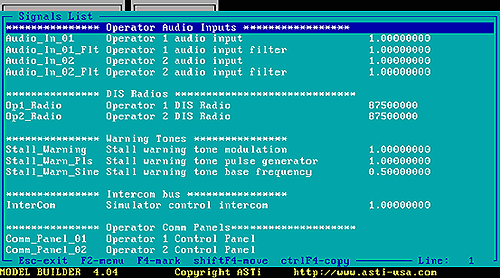
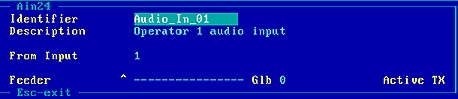
The first block of objects are titled Operator Audio Inputs, and these bring the operator input signals into the system. Note there are two objects per operator. The first, named "Audio_In_01", simply selects which signal path or "highway" is used for the first signal input. Move the cursor down and press ENTER to see the detail of the object. This is a very simple object. The first line is the object name or tag. This is important since the name is used to link the object to other objects. We will see how this works soon. The next line is a text description, which is optional but very useful. In this case we can see this is being used to bring in the Operator 1 audio input signal. The third line, titled "From Input", selects which audio input to use, and is set to "1". This means that an audio input connected to input 1 is now tagged with the name "Audio_In_01" and is available to be used by other objects. The last line is titled "Feeder. This would allow the signal to be directly routed to an output if required, however this is not required for this model
So, in summary, we create an object that performs the function we require (in this case it is an audio input), give it a name, do some processing function (which in this case is to select the source for the audio), and finally route the signal to an output object if required (which we don't at this point). This structure is common for all signal objects, even those of significant complexity
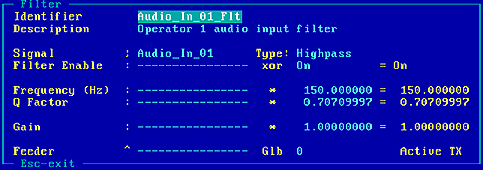
In order to look at the next object in the model we must exit the first and return to the Signals list. To do this, select the ESC key. Now move the cursor down to the next object named "Audio_In_01_Flt" and press ENTER. This object is a filter. The first two lines are as per the first object, name and description. The next five lines are the processing function for this object. The line titled "Signal" is looking for a signal source. In this case you will see the signal is the "Audio_In_01" signal, or the first signal object we looked at. We will now look at how this is entered. Move the cursor down so the "Audio_In_01" is highlighted. Now select the DELETE key. The original entry is now gone and "<White Noise>" is now shown in its place. This is the default for a filter. Now press ENTER again. The entry will turn red and the cursor will move to another copy of the Signals list brought up in the top half of the screen. Move the cursor down until the "Audio_In_01" line is selected. Now select the TAB key. The selected signal will now be inserted into the filter object, and the second copy of the signals list is gone from the top half of the screen. The remaining fields on these five lines set-up the operation of the filter. For more detail see the Model Builder Reference Manual. The final line is a replica of the last line of the audio-in object, a connection to a feeder. Again we do not need this for this model
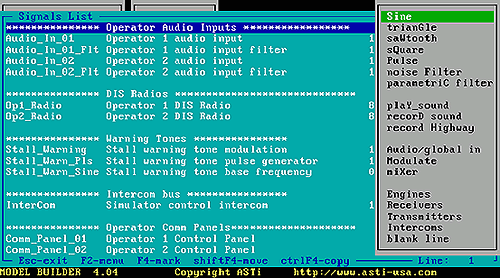
In the above exploration of the filter object, the signal object we needed already existed, this being the "Audio_In_01" object we looked at first. But what if this did not exist, or what if we want to add another object? This is done from the Signals list (or Controls or Feeders list) by selecting F2. So use the ESC key to leave the filter object, and with the Signals list displayed, select F2. A small menu will appear in the right corner. Of the choices, "aPpend" allows an object to be added after the current line, and "Insert" enters at the current line. Try selecting one of these options. You will see a long list of object types. These are all the signal objects available. Note that some of these choices give you further sub-choices for objects. For example try selecting "Receivers". You will get a list of six receiver sub-type objects. Note that if you create an object by mistake, you can simply remove it by selecting the object and selecting the DELETE key, followed by "y" to confirm
At this point we have looked inside a couple of specific objects, but we have not looked at the overall design of the model to understand the other objects required. If we refer back to section 2.1 to the system specification, we require; 2 radios (1 per operator), an intercom linking the operators, 2 communication control panels (one per operator), a stall warning tone that is available to both operators, and finally an ATIS radio transmitter. The implication of the above is that we also require an audio input object for each operator. Note that outputs are taken care of by "feeder" objects
Referring back to the signals list of the system, we can see that the list of objects very closely mimics the list given above. There are two sets of audio inputs, made up of an input and a filter. There are two radios objects, allocated one per operator. Three objects that combined make the stall warning tone generator. A single intercom object. Two objects called comm panels. Two objects that make-up the ATIS transmitter. In fact this is a good demonstration of the power of the object oriented approach. We have objects that very closely map to the real world. So how are the signal elements combined? The core to understanding this is the functionality of the communications (comm) panel
There is a single comm panel object per operator and it is here that all signals heard and transmitted by the operator are controlled. Looking at the system, select the "Comm_Panel_01" object. This is the operator 1 panel. This can appear a little complex at first inspection, however let us look at this in more detail
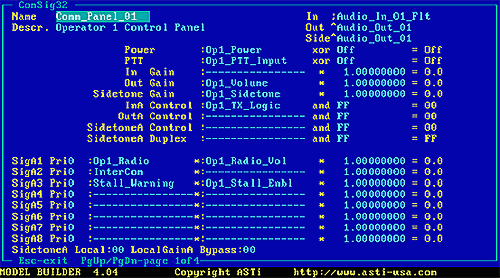
On the top right the first three lines are concerned with routing audio into and out of the object. The first, titled "In", is the input signal to the object. In this case it is the signal object "Audio_In_01_Flt", the operator 1 audio. It is this audio that is fed to radio and /or intercom objects that are connected to this panel for transmission. We will see how this works shortly
The next line is the destination for the output audio, titled "Out", and requires to be directed to a feeder object, which in this case is the operator 1 output. All signal objects that feed audio into this panel and have non-zero gain will be sent to this output
The third line titled "Side", allows independent routing of sidetone signals if required, however for this model we simply direct this to the same feeder object as per the "Out" signal. A sidetone signal is used to allow an operator to hear his own signal on transmission by a radio or intercom
The next nine lines of the object provide controlling values. This is our first introduction to the class of objects called "controls"
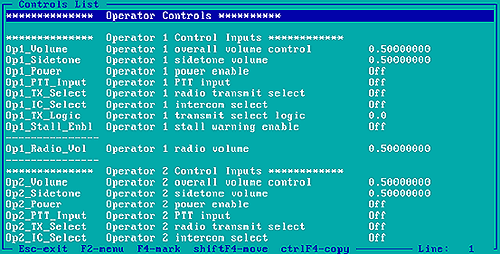
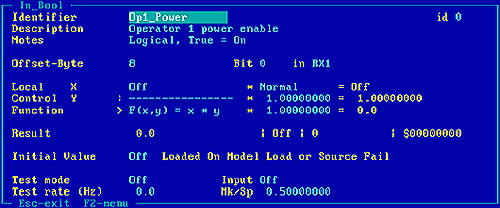
The first line, titled "Power", is a simple introduction to the concept of controls. Just as in the real world, the comm panel object has been modeled such that without a power connection it will not function. This is modeled as a logical function, such that if the input is true, the power to the object will be on. The connection field will be seen to contain the name of a control object, "Op1_Power". Move the cursor to this entry and press ENTER. This will bring up the Controls Selection List, with our control highlighted. Press ENTER again to see the detail of the object. Things to note are that, in the top left corner of the object, the type is defined as an "In_Bool", that is it is an input expecting a boolean (0 or 1) value to be passed to it. Next note the fourth line, titled on the left "Offset-byte". This tells the object where to look for its input. Controls can be supplied from a number of source buffers, but for this model all inputs are defined to be coming from a host computer via Ethernet, connected to the first Ethernet buffer. For more details on how this is done see the section later in this guide titled "Controls". This control is looking for a logical value to be supplied in byte 8 of an Ethernet packet, that is being sent to the port labeled RX1. The next three lines of the control, headed "Local X", "Control Y" and "Function", allow the raw input from the host to be modified, by applying a function to the value, however for this instance no function is required, and all these parameters are left at the default settings. Select ESC twice to go back to the comm panel object
The next control line is headed "PTT". This is the push-to-talk control input. The audio connected to the "In" connection will only be passed through if the PTT control is set. Again this has a logical control attached to it, "Op1_PTT_Input" , and is expecting a host input
The next line down is labeled "In Gain". This allows a gain factor to be applied to the input signal. For this model no connection has been made in the control connection field, since we do not need to adjust the input gain from an external control value. Note however that the gain factor to the right of the "*" symbol is set to "1.00000000". The default is 0.0 for this when the object is created. Setting the gain factor to 1.0 means that whenever the PTT control is set, the input signal will be passed into the object without any gain changes being applied, i.e. unity gain. If the default 0.0 value were not modified, the input signal would be multiplied by a gain of zero, giving a zero signal level
The line following this is titled "Out Gain". This does the opposite to "In Gain", this controls the output signal gain. In fact this controls the overall level of all signals output by this object. For this control there is a connection to an externally supplied control value, "Op1_Volume". This is a "Float" type input and expects values in the range 0.0 to 1.0. See the control object to see the details. Note again that the gain factor to the right of the "*" symbol has been set to 1.00000000 for the same reasons as the "In Gain" control
Next we have the "Sidetone Gain", and this behaves in a similar way to the "Out Gain" except it only controls the gain for the sidetone signals. This model is set-up to expect an input from an externally supplied host control. Note that again the gain factor has been set
The next control is something different, titled "InA Control". This control determines the routing of the input audio signal to the signal objects connected to the object. Before we go further describing this control we need to look at some detail of how signal objects connect to the comm panel
Looking down the comm panel we can see that there are signal objects connected in the lower part of the object labeled "SigA1", "SigA2", "SigA3", etc. This will make more sense if we consider a real example, as we have here in the sample model, of a radio object being connected to the comm panel. This is the case for the "SigA1" signal, where a connection is made to an object named "Op1_Radio". With a radio, we not only want to hear the received audio, but we also want to pass an input signal to it, and also listen to the sidetone signal of the transmission. This is where the real power of the comm panel is, in its ability to hook-up the required signal paths. Any signal object that we place into the "SigA" fields of the comm panel automatically take as an input the input signal of the comm panel. The output of the object is also routed into the comm panel as a signal source. Additionally the sidetone signal generated by the object is routed back into the comm panel. This is an important concept to understand and so if you need to, re-read this paragraph. It may also help to look-up the Comm Panel object in the Model Builder Reference Manual
Note that this also applies to intercom objects, since they also require an input, have an output, and generate a sidetone signal
It will also be seen that basic signal objects, such as the "Stall_Warning" tone signal in this model (connected to the "SigA3 field), may be connected to the comm panel. In this case there is clearly no need (or sense) in supplying an input signal to the object, and indeed this does nothing in any case, however the output of the object becomes available to be mixed into the overall output of the comm panel
So now back to the "InA Control" connection. The first thing to note about this control is the use of the logical operator "and" between the control field and the value to the right of the operator. Clearly this is expecting some boolean logic to take place between the supplied control and the value. Next, note the value on the right of the "and" is set to "FF". This is a hexadecimal number and is used as a mask. The "FF" value is the default for this value. "FF" in binary is "11111111" or all eight bits set. Now note that there are eight signal connections available in the signal connection fields of the object. The intention is that the eight bits of the output of the logical function are allocated as enable bits, in this case enabling the routing of the input signal to the signal objects. The least-significant-bit is assigned to "SigA1" and the most-significant-bit to "SigA8". So we need to set a value in the control field of the "InA Control", that when "anded" with "FF" causes the output to set the required bits. For example, if we want to enable to input signal to be routed to the first signal object, the "Op1_Radio", we need the output of the "InA Control" function to be "01" (hex) or "00000001" (binary). Therefore we need to supply a value of "01" hex in the control value. If we wanted to route the input signal to both the "Op1_Radio" (SigA1) and "Intercom" (SigA2) objects, we would need to set the control value to "03" (hex) or "00000011" binary
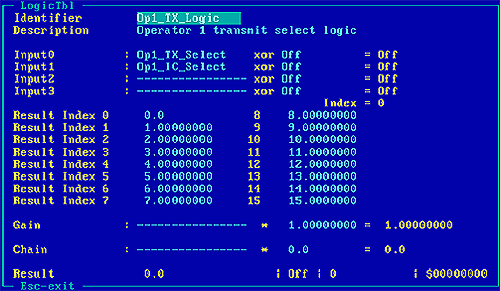
So now we need to look at how the control value is generated. This is the "Op1_TX_Logic" control. Move the cursor over this and press ENTER. The controls list is brought-up with the control highlighted. Press ENTER again. We will now see that this brings up an object referenced in the top left corner as a "LogicTbl", which is short for logic table. This function is a pre-defined control object found under the "Logic_function" sub-menu. This allows up to four input controls and depending on the boolean state of these controls, select an output value. For example if the first input is set and all others are not, then the value held in the "Result Index 1" field will be output. If all four inputs are set then the value in "Result Index 15" will be output. This is an example of a derived control since the control is not directly supplied by an external source. Note however that the two input values "Op1_TX_Select" and "Op1_IC_Select" are externally supplied boolean input objects. It is worth noting another feature of Model Builder at this point. If we look at the bottom line of the "Op1_TX_Logic" object, titled "Result", we can see that in fact there are four fields shown, these being a real or float value, a logical value (where any non-zero value is treated as TRUE), an integer value and finally a hex value. When this control is entered into another object, the correct control result type is automatically used, as required by the specific object control field. So now use the ESC key to return to the Comm Panel object
We can see that the next three lines of the control section of the Comm Panel do not have control values. The first of these, titled "OutA Control" allows a control value to select what signal object outputs are enabled. In this model this is not required, but if it were this would be implemented exactly as per the "InA Control". For this model all received audio (or tones) can be sent to the output at any time
The next two lines relate to control over the operation of the sidetone signals, but are beyond the scope of this document
The next eight lines of the comm panel have already been addressed to some extent in the preceding text, however these are the signal objects that are hooked up to the panel. Looking along the line first up we have the identifier (for example "SigA1"). This is followed by "Pri". This stands for "priority", and is used in conjunction with Intercom objects. This is an advanced feature; please see the Model Builder Reference Manual for more details. Next we have the connection field for the signal object. Following this there is a "*" followed by a connection field for a control signal. In the sample model this is used in two ways. For the "SigA1" line, connected to the "Op1_Radio", this field is used to provide a volume control connection for an externally supplied control value. The "SigA3" line, connected to the "Stall_Warning", the control field is used to connect to a boolean externally supplied enable control. Finally moving along the line, following another "*", we have pre-setable gain factors for each signal object output
The last line of the Comm Panel provides advanced functions allowing more control over sidetone operation. Again, see the Model Builder Reference Manual for more detail
Return now to the Signals List. Let us now look at the radio objects. We have already seen that the operator radios ("Op1_Radio" and similarly "Op2_Radio) are tied into the operator comm panels and should understand how the audio signals in and out of the object work. To re-cap, placing a radio into a comm panel signal connection field means that the input audio signal is taken from the "In" signal of the comm panel, and is routed according to the "InA Control" function and the state of the PTT control to be transmitted by the radio. The received audio from the radio is brought back into the comm panel, as is the sidetone signal for mixing with the other signal objects connected to the comm panel
The radio object is a sophisticated model of a real radio, with many parameters that may be tuned to match a particular real world model. The default settings for the majority of values may be sufficient for many applications, however there are a number of critical values that must be set-up, and these are discussed below. The radio model performs all frequency matching for radios, both local to a system, and those received via a DIS network (if so connected), and computes all in-tune logic. It also calculates received signal-to-noise level, based upon ranging and transmission power, and adds appropriate background noise effects according to defined squelch values, etc. In short this object has far greater capabilities than this short guide can cover and again the reader is directed toward the Model Builder Reference Manual for more comprehensive details
So what aspects make-up a functional radio? Move the cursor up to select one of the operator radios and press ENTER. This will display the radio object. Again let us examine this line by line. As usual the first two lines are the name tag and description. Next we have a line titled "Power/Mode". This is an important line. No matter what else we do, if the mode is set to "0", the radio will remain off, since this represents "power off". It is possible to use the control connection field to bring in an external control connection, however for this model the mode has been preset by using the "+" function on this line and setting the addition value to "1". Note, this value will by default be "0". So what does the "1" mean? Remember the line is titled "Power/Mode". The inference is that we are in "Mode 1". So how do we know what this is? Look to the bottom line of the object ? we can see this states, "page 1 of 4". Therefore there are more pages to this object. Select the PAGE UP key. This will take us to page 4 of 4. Immediately the most obvious thing on this page is a list of radio modes in the lower half. Therefore we can see that the Mode 1 corresponds to an FM radio with the characteristics defined in the numbers shown across the page. This guide does not address the reminder of the parameters listed, since this would further complicate the issue. However if you want to understand this more, refer to the Model Builder Reference Manual. We can see that if we had chosen another value for the mode value, the radio would behave with different characteristics. Use the PAGE DOWN key to return to page 1 of the object
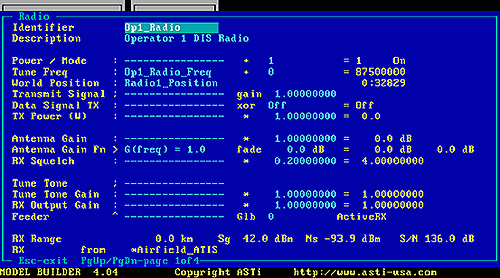
Moving down a line, to "Tune Freq", this is the radio frequency that the radio is tuned to. A value of "0" will turn the radio off. In the sample model, a connection is made to an external control that supplies the tune frequency in Hz. Select the control object, and press enter to display the detail of the object. This is an "In_Float" object. Look at the "Notes" line. The input is stated as being in MHz, yet the output is in Hz. This is done using the line titled "Function" and by setting up a multiplication factor of 1000000.0. Therefore we can scale values, according to the needs of the objects in the model. If we need to be more sophisticated, we can insert functions into the function line where the current entry, "F(x,y) = x*y", is defined. This is beyond the scope of this guide ? see the Model Builder Reference Manual for more details. Use esc to return to the radio object
The behavior of a radio is determined by the frequency it is set to. At any frequency above 100kHz, the radio will be treated as in tune with any other radio that is ± 12.5kHz of the currently tuned frequency. This is done to allow the use of floating point numbers to be used without having to worry about the effects of rounding. Any frequency below 100kHz is treated as clear comms, without ranging, noise, or curvature of the earth effects. However, for a radio to tune to another in this band, the frequency must be an exact match
The next line down of the object is titled "World Position". Just as this title implies, each radio is modeled to have a location in the world. In fact this line is again critical. Without a position connection the radio will not function. The connection field here is to a control object named "Radio1_Position"
Move the cursor down to this line and press ENTER to bring up the controls list. Press ENTER again to see the detail of the object. This object can be seen to take in three other external control inputs from the host, these being altitude, latitude and longitude
There is another very important thing to note in this control object. Look down to the seventh line, titled "Exercise No". This has been preset using the "+" function on this line to be "1". This value is the DIS exercise number that this radio operates in. ONLY RADIOS IN THE SAME EXERCISE CAN COMMUNICATE. Hence it would be entirely possible to have two radios, that were tuned to the same frequency, and to be physically modeled at the same location, but not be able to hear each other if the exercise numbers were not the same. If the other radios in this model are examined we will see that they are all preset to operate in the same exercise
Finally look at the line titled "Entity ID". This entry determines the scope of this radio. For this model the scope is defined as "None". This means it only exists within this model, and has no scope outside of this. Other options are "Local", which means that if the DACS unit had two DSP cards (either TDM or Waveform Synthesizer) it would be able to receive and transmit to other radios in the second DSP, assuming the radio parameters match (freq, range, etc), and the exercise number matches. Finally the mode could be "DIS", which means it can receive transmissions brought in over the DIS interface, again assuming match parameters
Use ESC to return to the radio object. All the remaining fields and values are left at the default values for this model. See the Model Builder Reference Manual for further details. Use ESC to return to the signals list
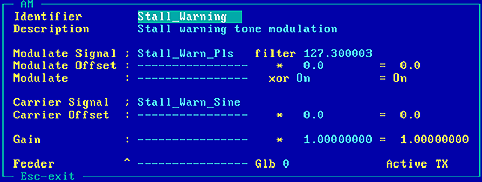
The stall warning tone signal is made of three component signal objects. In fact there are two source objects that are combined by the third. The latter object is something known as an AM or Amplitude Modulator, and in the Signals List is titled "Stall Warning". Use the cursor and select this object
This object provides the ability to modulate one signal with another. This is often used to simulate warning tones, as indeed is the case here. The base or carrier signal is fed into this object using the line titled "Carrier Signal". Move the cursor down to this line and highlight the signal object "Stall_Warn_Sine" and press ENTER twice to see the detail. This object is a simple sine wave generator. The parameters for this object have been preset. The frequency is set to 1600Hz and the gain to 0.5
Select ESC twice to return to the AM object. The modulating signal is brought into this object using the line titled "Modulate Signal", and the connection field contains the object "Stall_Warn_Pls". Move the cursor and press ENTER twice on this object
This brings up a pulse object. In this object we can specify a pulse frequency or pulse duration, and the mark-space ratio of the signal. Again the parameters for this object are pre-set such that we have a frequency of 8Hz and a mark-space of 0.5. This essentially means we have an 8Hz square wave. The gain has been set to 1.0. Select ESC twice to return to the AM object
So what we end-up with is a 1600Hz sine wave turned on and off at 8Hz by the pulse object. The only other thing to note is the field titled "filter". This is a lag filter used to smooth the effect of applying the modulation to the carrier. This helps to avoid clicks and other unwanted effects that can occur when signals, particularly square waves, are used to modulate other signals. Note, the value used here was tuned by ear to achieve the required sound. Use ESC to return to the signals list
The intercom object is actually very simple. Move the cursor to the intercom object and press ENTER. This object represents an intercom "bus". Everybody that connects onto the bus becomes connected to anybody else who is also connected to the bus. This is achieved by the simple means of inserting this object into a signal connection field within a Comm Panel object. The only parameters within the object that have been modified are the "Power" status that has been set to "On" and the "Signal Gain" that has been preset to "1.000"

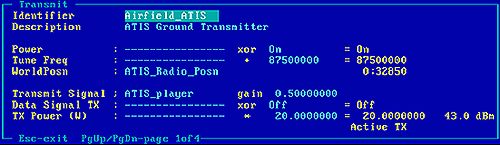
The ATIS transmitter is made-up of two signal objects. The first is simply a radio transmitter, named "Airfield_ATIS". Move the cursor and select this object to bring up the detail. This will look very familiar. Note here that the power is preset to "On" and that the frequency has been manually set to 87500000Hz (87.5MHz). We also have defined a control object for this objects world position, "ATIS_Radio_Posn". Note however that a connection has been made to the "Transmit Signal" signal connection field. This is where the ATIS message is brought into the radio for transmission. We will return to this shortly. Use the PAGE UP key to bring-up page 4. Note that that the radio is defined as an FM type with identical parameters to that of the operator radios. For more details of the options and parameters that can be set-up see the Model Builder Reference Manual
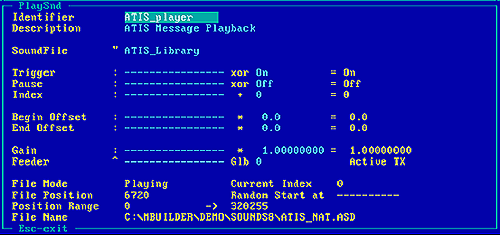
Returning now to the "Transmit Signal" connection object on Page 1 (use "Page Down"). Move the cursor and select on "ATIS_Player". This is the object that provides the voice message. Press ENTER to bring-up the detail for this object. The first thing to note is that this is a "PlaySnd" object. This object provides the means to replay a sampled soundfile. The complexities of soundfile creation are not covered here. In this case we will just take it as fact that the required soundfile exists. The soundfile for playback in this case is named "ATIS_Library". This soundfile has been set-up to continuously loop the message. Looking down the PlaySnd object we can see that the only parameters that have been set-up are the "Trigger" control, which has been preset to "On" and the gain control which has been preset to "1.000". Use ESC to return to the signals list
The final signal object in this model is a Vox input provided to provide a visible indication of signal activity from an input. Move the cursor down to the object and press ENTER. In order to check a microphone input it is simply a matter of changing the "ch" number on the line titled "Signal" to select the required input. Speak into the microphone and monitor the value shown for "Signal Level". Normal speech should record a value of between 0.1 ?0.3. If this is not so refer to the Model Builder Operation and Maintenance Manual for details of how to adjust the input gain. Select ESC three times to bring up the Model1 Configuration Window
Feeders are objects that route audio from the model to the outputs of the system. Since there are two types of system available, TDM systems and Waveform Synthesizer systems, this section is split to cover both variants. Please move to the appropriate section of this guide, dependent on whether your system is a Waveform Synthesizer or TDM based system
Firstly, before looking at the Feeder Objects themselves, look down the Model1 Configuration Window to the fifth line titled "Highway Width". The value shown immediately after this defines the number of channels the system has available. In this case it is set to two, giving two input and two output channels. Note: if you try to use more than the defined number of highway channels the system will not report an error, the result will simply be no audio either into or out of the system on the additional channels
Select the F2 function key and bring up the object menu. Move the cursor down and select the "feeDers" option. This will bring up the feeders list
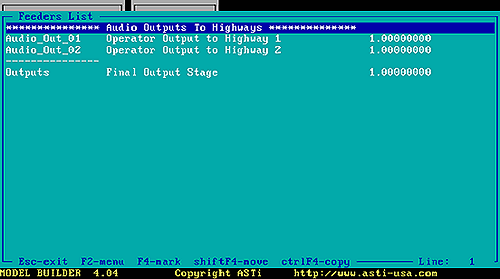
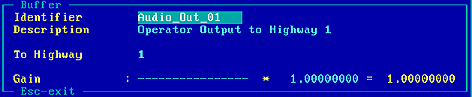
The "Audio_Out_01" and "Audio_Out_02" objects were seen earlier when we examined the Comm Panel objects. These were stated as providing the output connections to the two operator positions of our system. These use objects known as "Buffers". These essentially provide a label or name tag for an output highway. Move the cursor down and highlight "Audio_Out_01" and press ENTER. This will bring up the detail of the object
The buffer object is very simple. There is a name and description and two additional lines. The line titled "To Highway", defines which output highway the audio will be sent out from. In this case this is preset to "1". The final line, titled "Gain", has been preset to "1.000". Select ESC to return to the feeders list
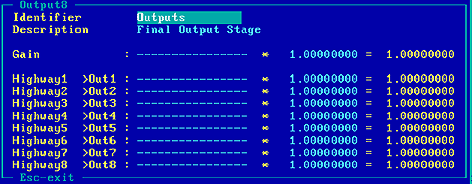
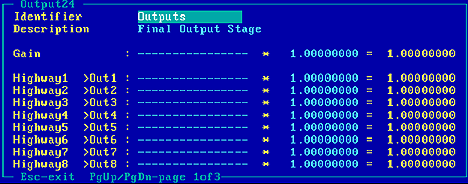
The final feeder object in the list is an object named "Outputs" and this in fact is made-up from an object called "Output8". This is because there are, as a maximum, 8 outputs available from a Waveform Synthesizer card. For this object the "Gain" value, which is in fact the master gain for the overall system output, has been preset to "1.0000". A model must have an Output object. Without it no audio will be passed to the output stages
The feeders required for a system using the TDM ring architecture are slightly more involved due principally to increased flexibility that is available. The analogue-to-digital and digital-to-analogue conversions are done out on the ring at the Remote Interface Units (RIUs), and hence the feeders are in fact placing the digitized audio into certain time slots on the time division multiplexed ring, which are then routed to certain input/outputs. It is not the intention of this guide to cover this area in any more depth and hence the following description assumes that a basic understanding of the hardware is in place
Starting from the Model1 Configuration Window, note the fifth line titled "Highway Width" is set to "2". Also note the eight line titled "No RIUs on TDM", which is set to "1". This means that the system is configured to support a single RIU, and has two audio paths available

Now select F2 and select the "feeDers" option. This will bring up the list of feeder objects. There are more objects in this list than appear in the list for the Waveform Synthesizer
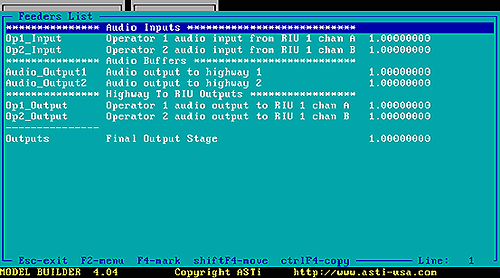
Since we can have a number of RIUs on the TDM ring we need to tell the system not only where to place its outputs, but also where to obtain its inputs. To do this we use an object called an "RIUin". This is an object specially tailored to the task. Move the cursor down to the object named "Op1_Input" and press ENTER. Within the object we define the RIU number we wish to obtain the input from, in this case this is "1", and specify which audio highway we want to bring the audio in on, again in this case this is highway "1". Note that the input highways are separate from output highways, even if numbered the same. Each RIU has four input channels, and this object allows selection of the audio source to be brought in. This could be achieved by assigning a control to be brought into the "Control" connection on line four of the object, but this is not used in this model. For this example the simple method of setting only the "Input ChA" gain to "1.0000" and the remainder to "0.0" is used. This means that only the audio input of RIU number 1, Channel A will be fed into the model onto input highway 1. Use ESC to return to the Feeders list

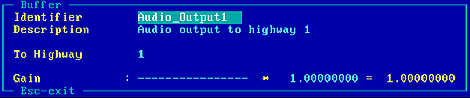
The first step in outputting a signal is to assign it to a highway. This is done using a "Buffer" object. Move the cursor down the signals list and select the object called "Audio_Output1". This is defined as the output for the Operator 1 Comm Panel. This is a simple object. There is a name and description, and two additional lines. The line titled "To Highway", defines which output highway the audio will be sent out from. In this case this is preset to "1". The final line, titled "Gain", has been preset to "1.000". Select ESC to return to the feeders list
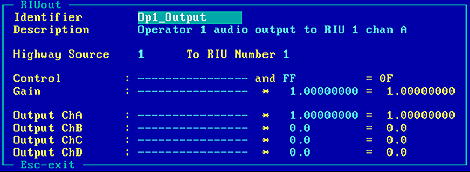
So far we have routed the audio to a highway. Next we need to tell the system which specific output we want to place the audio on
We do this using an "RIUout" object. This is very similar to the input object we looked at to bring the audio into the model. Move the cursor down the feeders list and select the "Op1_Output" object. We define the "Highway Source" we wish to select, in this case "1", and the "To RIU Number" we wish to route the audio to, again "1". Finally we route the audio to specific output on the RIU. In this model this has been achieved by the simple expedient of setting the "Output ChA" gain to "1.000" and the remaining outputs to "0.0". Therefore the audio directed to highway 1, is sent to RIU number 1, and the audio is output from Channel A. Use ESC to return to the Feeders list
The final feeder object in the list is an object named "Outputs" and this in fact is made-up from an object called "Output24". This is because there are, as a maximum, 24 output time slots available from a TDM card. For this object the "Gain" value, which is in fact the master gain for the overall system output, has been preset to "1.0000". A model must have an Output object. Without it no audio will be passed to the output stages. Use ESC to return to the Model1 Configuration Window.
We have already touched on some Control objects in the exploration of the Signal objects of the model. However a the risk of repeating ourselves lets quickly recap on the purpose and function of a Control
A control is used to provide a means of changing the operation of another object. Most often this will mean in real-time, or dynamically, but occasionally a control will be set once, to provide an initialization setting, which gives a static control
So, where do the values provided by these control objects come from? There are basically two simple classes of control, external and internal
An external control can come from the Ethernet interface provided to connect to an external host computer, or brought in from the TDM ring (assuming a TDM system is in use), or even sourced from an I/O card, such as a DI (Digital Input) card, that is fitted to the DACS unit itself. Of these, the most common would be a control brought in on the host Ethernet interface. This guide only covers this type of external control. See the Model Builder Reference Manual for other types
An internal control is one derived from values available inside the model. For example we may use a logic function that computes an integer based on the value of two other control inputs. The control is therefore internal
An external control from a host is brought in using the Host Ethernet connection. Full details of the options available for the Ethernet interface are not covered here. See the Model Builder Reference Manual for more details. The controls from a single host are usually grouped into a single packet that is sent periodically to the DACS unit and stored in a buffer. The packet can be any length up to a maximum of 1500 bytes
So how do we design the packet structure? Well, one thing to note is that we will need to pass different types of data, we may have float values, integer values and logical (or boolean) values. This means that the size associated with the types may be different. Usually a float value will be passed using a four byte "word". An integer could typically be a single byte, two bytes, or four bytes, this depending on the number range the value is passing. A logical value could be a single byte, or may use bit packing such that the individual bits of the byte are used to represent individual control values
Model Builder provides a number of input objects that allow us access to the Ethernet packet buffers. Let us return to our Sample Model for a closer look. From the Model1 Configuration Window select F2, and from the menu select the "Control" option. This will bring up the control list
Move the cursor down to the "Op1_Volume" control and press ENTER. This will bring up the detail of the object. This is an "In_Float" object, used to bring a floating point number input into the model. There are a number of things to note. The first is that a name or tag is assigned to the operator on the line titled "Identifier". This is the label used to link this object into other objects. The name is followed by a "Description", as per all other objects. The next line is titled "Notes" and this can have various uses, but it can very conveniently be used to record the intended control value range. In this particular case the control is expected to change over the range from 0.0 to 1.0
The next line, titled "Offset-Byte", is where we tell this control to look in the input buffer for this value. This control is set to byte "0", or the first byte of the input packet. The next field, titled "Type", defines the byte ordering used to interpret the value. This is required since some host computer operating systems use the order of the bytes differently to others. The options here are "Big_Endian", "Little_Endian", or "Default". When set to "Default" the format is taken from the Ethernet Status Page. If you are unsure what this should be, check with the documentation supplied with your operating system for the host computer. The last field on this line, titled "in" defines the source buffer for the value. There are in fact 8 Ethernet buffers, that may be set-up and accessed using different port numbers. This model assumes that all data will arrive in the first Ethernet buffer, called "RX1"
The next line, titled "Float Type", defines the format of the passed value, and depending on the format chosen sets the number of bytes used, defined in the field titled "Size". Typically this would be four bytes. The thing to note here then is that, if we use an "In_Float" that uses a length of four bytes, then we must allow for this in the offset byte numbering of the next value. In our example here the offset byte is defined as "0". Hence the next unused byte will be byte "4", so our next control object "Offset-Byte" value will set to "4"
Looking down to the next line, titled "Local X", we will see that the value is set to "0.50000". Where did this come from? To understand this we need to move down the object to the line titled "Initial Value" which is set to "0.50000". The text following this states "Loaded On Model Load or Source Fail". The value preceding this is used both as an initial pre-load value, and as a default. The default mode is enabled when the system detects that the host is no longer sending updates to the receive buffer, and causes the value to be used as the current input. Normally the "Local X" value would be the latest value received from the Ethernet buffer
Following the "Local X" line, there are two lines that allow a function to be applied to incoming value. This in its simplest form could just be a scaling value. Alternatively we can define a math function to be used on the line titled "function", that could use another control value brought in on the line above, titled "Control Y". This is not covered further in this guide
The next line of the object, titled "Result", displays the current output value of the control. Note that the value is displayed in four formats; float, logical, integer, and hexadecimal. This is done to avoid the need to define a type for a control value when entering this into another object. The correct type for the control input is automatically selected from the control value
The final two lines of the object provide the means to set-up test values for the control output. We can toggle the "Test Mode" value to on using the keyboard, and either enter a fixed value in the "Input" field, or allow the value to be ramped up and down using the "Ramp rate (Hz)" value and the "Max" and "Min" values. This facility can be very useful in testing a model before linking the system to a host, or even when linked to a host. Note that setting the "Test mode" overrides the current Ethernet input value. Use ESC to return to the "Controls List"

Move the cursor down to select on the "Op1_Power" obect and press ENTER. This will display the details for this object. Note that this is a "In_Bool" object, which is an object that is looking for a logical on/off function. Essentially though the structure of the object is very similar to the "In_Float" type
Note that we must define the "Offset-Byte", that is the location of the value in the incoming Ethernet packet, and the "Bit" number of the value of interest. If the host is simply using a single byte to represent a logical value then the "Bit" will always be "0". However, if the data is being "bit packed" for reasons of efficiency, then each of the eight bits of a particular byte may be being used to pass individual values. In this case we would have multiple "In_Bool" objects all referencing the same "Offset-Byte", but set to look at different "Bit" values. Use ESC to return to the "Controls List"
There are a number of other input control objects that are not required for this model that are similar to the two objects described. See the Model Builder Reference Manual for further details
An internal control object is an object that has no direct connection to the external buffers. The output is a function of one or more control values that are already available within the model. This model includes two such controls, the "Op1_TX_Logic" object and similarly the "Op2_TX_Logic". The functionality and use of this control is examined in Section 5.1.6.2
In order to understand how the data is being passed between the DACS and a host it is recommended that an Interface Control Document be maintained as a model is developed. The purpose of this, for example, is to record the byte allocations of values being passed, the names allocated, the range of the values being passed, and if required the associated host variable names being used, etc. In fact Model Builder helps with this task, since whenever a model is saved, a number of other files are automatically produced along with the saved model, one of these being an ICD for the controls within the model. This file is produced with a ".ICD" extension and has the same name as the model
Click here to view the ICD file for the sample model